February 9, 2015

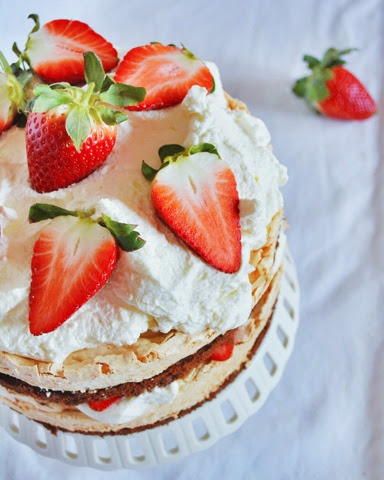
Chocolate Meringue Cake


I had this craving for brownies AND pavlova over the weekend so a date was set Saturday night. Just me, my mixer and the oven. 

It is such a great mash-up of my two favorite desserts: chocolatey, cakey layer topped with crisp meringue softened with softly whipped cream. The strawberries added the fresh element that paired together with both the cream and chocolate. I'm sure other berries would work well, maybe even fruits in season. 

It was such an easy cake to whip up. The longest wait was spent for the cooling of the cake which is needed before the whipped cream is added. The finished cake is impressive, making others think more time and effort was spent. 

I didn't realize I had ran out of berries late Saturday night so cake was assembled and enjoyed after Sunday supper. My family was happy to enjoy this with me. And my sons now call this a "just because" cake. 


Chocolate Meringue Cake
adapted from The Joy of Baking

Chocolate Layer:
4 large egg yolks
175g AP flour
60g cocoa powder
1 1/2 tsp baking powder
1/4 tsp salt
152g butter, room temperature
130g granulated sugar
1 1/2 tsp vanilla extract
110g milk, room temperature
Meringue Layer:
4 large egg whites
1/4 tsp cream of tartar
175g granulated sugar
Chantilly Cream:
480g heavy whipping cream
45g granulated sugar
1 tsp vanilla extract

Preheat oven to325F. Prepare two 8-inch springform cake pans by oil spray and lining with parchment then spray again.

Sift flour, cocoa powder, baking powder and salt into a medium bowl, set aside.

In a mixer with paddle attachment, cream butter over medium-high speed, adding sugar a tablespoon at a time. Once added, keep mixing until light and fluffy, about 5 minutes.

Reduce speed to medium and add egg yolks one at a time, beating well after each addition and scraping bottom of bowl.

Reduce speed to low. Add cocoa-flour mixture in 3 batches alternating with milk and beat until just combined.

Place batter into your prepared pan. The batter will be thick, it helps to smooth out with an offset spatula, set aside.

In a clean mixer with whisk attachment, beat egg whites in medium speed with cream of tartar until frothy. Turn speed to high and beat until stiff peaks form.

Evenly divide meringue between the two pans, smoothing tops. Bake for 24-28, switching sides halfway through. Transfer in rack to cool completely.

To make the Chantilly cream, place cream, sugar and vanilla in a chilled bowl and whisk until soft peaks form.

To assemble: place one layer of cake, meringue side up on a serving plate. Spread half of the cream and add berries in an even layer. Top with second layer of cake and repeat. Best served the day it's assembled. Cake can be kept in the refrigerator for a day.  

January 27, 2015

Calamansi Muffins


The famous Calamansi Muffins made popular by a cafe in island resort Boracay has been in my list to bake all these years.


Thought it'd be a great idea to use up the last of my calamansi haul (for now) to bake into cup-size tart morsels. 


The recipe involves creaming the butter with sugar until light and fluffy which makes for a tender crumb. The liquid component uses freshly-squeezed calamansi juice with milk mixed in, which is almost like making buttermilk (soured milk) that gives the cake a light, soft mouthfeel. 

These really are more like cupcakes than muffins so couldn't resist an addition of icing like I did with the calamansi bundt cake I baked a few weeks ago. 


The calamansi flavor really shines through with every bite. I can't wait to bake again when I get ahold of more calamansi. 


Calamansi Muffins
recipe adapted from here
makes a dozen

120g (1/2 cup) freshly-squeezed calamansi juice
120g (1/2 cup) milk
180g (1 1/2 cups) all-purpose flour
5g (1 tsp) baking powder
2g (1/4 tsp) salt
112g (1/2 cup) butter, softened
200g (1 cup) granulated sugar
2 large eggs

for the glaze:
60g (1/2 cup) confectioners' sugar
15g (1 TBSP) freshly-squeezed calamansi juice
finely grated calamansi zest

Preheat oven to 350°F. Prepare baking tray by greasing or using paper liners; set aside.

Place calamansi juice and milk in a small bowl. Stir to combine and set aside. In another small bowl, whisk together the flour, baking powder and salt.

In a mixer, cream butter over medium-high speed, adding sugar a tablespoon at a time. Once all the sugar is added, keep mixing until it is light and fluffy, about 5 minutes.

Reduce speed to medium and add eggs one at a time, beating well after each addition and scraping bottom of bowl.

Reduce speed to low. Add flour mixture in 3 batches alternating with calamansi-milk mixture and beat until just combined.

Place batter into your prepared pan and bake until tester comes out clean, 18-22 minutes. Transfer in rack to cool for 10 minutes then take out from pan and let cool completely.

To make the glaze, stir together the juice and confectioners' sugar. Spread about a teaspoon over tops. Grate calamansi if desired and let glaze dry.


Happy baking!


January 12, 2015

Calamansi Bundt Cake


Celebrating winter and it's citrus bounty with cake made from fruits native to my home country: calamansi. 

Even though I have a small tree that's been good to me, I still get a thrill when I come across them in the markets and try to hoard them. 

My family has been enjoying drinking calamansi juice and wanted to make something else different besides the usual curd and cookies. A Bundt cake is always impressive with it's size and curves without the need for frosting. 


The glaze gives it a boost of calamansi flavor and sealed in the moisture that it was even flavorful even after a couple days. The addition of sour cream made the cake tender and gave it tangy that complements the calamansi. 

The recipe was adapted from Martha Stewart. I used calamansi liqueur (calamansi that I have been steeping in vodka for a couple months) but other citrus liqueur (like limoncello) or more fresh juice can be added to substitute. 


Calamansi Bundt Cake

For the cake:
2 Tbsp. finely grated calamansi zest, from about 35 calamansi 
400g (2 cups) granulated sugar
225g (8 ounces/1 cup/2 sticks) unsalted butter, room temperature, plus more for pan
360g (3 cups) all-purpose flour, plus more for pan
5g (1 tsp) baking soda
5g (1 tsp) salt
6 large eggs
180g (3/4 cup) fresh calamansi juice, from about 35 calamansi
2 Tbsp. calamansi liqueur 
1 tsp. vanilla extract
180g (3/4 cup) sour cream, room temperature

For the glaze:
240g (2 cups) confectioners' sugar
1 Tbsp. finely grated calamansi zest
60g (1/4 cup) calamansi juice


1. Preheat oven to 350°F. Butter a 12-cup Bundt pan and dust with flour, tapping out the excess. 
2. Stir together calamansi zest and sugar in a small bowl until well blended. Set aside. In a medium bowl, whisk together flour, baking soda and salt. 
3. In a mixer in medium-high speed, cream butter with sugar-calamansi mixture until pale and fluffy, 4-5 minutes. Add eggs, 1 at a time, beating well after each addition. Beat in juice and extract. Reduce speed to low. Add flour mixture in 3 batches alternating with sour cream and beat until just combined. 
4. Transfer batter to prepared pan, smooth top and tap pan firmly on counter few times. Bake until tester comes out clean, 45 to 50 minutes. Place on wire rack to cool 30 minutes. Turn out cake onto rack to cool completely. 
5. Make glaze by whisking together confectioners' sugar and calamansi juice until smooth. Pour glaze evenly over cake, letting it set before serving. Cake can be stored at room temperature under cake cover, up to 2 days. 


March 5, 2013

Calamansi, Blood Oranges & Honey Tangerine Cornmeal Upside-Down Cake


Woohoo, a new post! This is totally unplanned (but then so was my 16-month "hiatus" LOL ) but surprising events this past week led me to sign back in to this blog and give it an update.

(For all the wonderful people who left comments while I was away: Thank You! They are much appreciated and will reply to each one of you as soon as I can.)

So where have I been? What I've been up to? Well, I've started to raise chickens in my backyard. My family got our first chicks October 2011, and now have seven hens. Their names are: Julia, Martha, Ina, Padma, Rachael, Pepper (who I wanted to name Nigella but my son really liked the name because it matched her black feathers, the next hen for sure), and last but not the least Ted. Then several months ago, we rescued a rooster which we named Gordon. We've been enjoying their beautiful, flavorful eggs. My husband and I have always wanted to keep chickens, most especially after visiting Soul Food Farms a few years back.

Also about a year ago, my family found a local farm that grows vegetables and raises animals without pesticides and just recently now part of their herd share. It's been exciting to see my boys get to milk the farm cow (named Glenda) one day a week and get the benefits - milk can't get any fresher than that! This past couple of years have truly been a journey for my family towards an agrarian lifestyle. I hope to share them with you here.

But for now, let's move on to this cake.

schmear that cake pan, whisk the dry ingredients and make colorful citrus wheels

Well, the cake all started with Instagram (You can also say that's another place I've been hanging out this past year LOL). The photos I see from all these really creative people have been an inspiration. The most recent was this one in particular from Hourie Sahakian (@houriesloves), head baker at Short Cake in Los Angeles.

Seeing that photo of her citrus upside down cake last week made me just want to recreate it, make the cake come to life!

I adapted Thomas Keller's "pan schmear" recipe from ad hoc at home since I've had great success with that recipe (and a blog post to show for it). I already know it'll be much easier arranging the citrus wheels on it instead of an already hot, sticky caramel.

I wanted something different for the cake instead of a usual white batter so decided to try a cornmeal base using Lemon Cornmeal Cake recipe from The Cake Book by Tish Boyle.


I used a combination of calamansi, blood oranges and honey tangerines for this cake because I wanted to play with different sizes and colors. I'm sure any of your favorite citrus would work with similar results. There are a few things I would do differently next time. Cooking the citrus in sugar syrup first to draw out some of their moisture. I found the sugar bottom got diluted from the citrus juices and made the batter moist.

I didn't realize this until after I flipped the cake right side up and remedied that using my blowtorch for some brulee action. The thin layer of crackly sugar topping made for a great textural contrast.


Calamansi, Blood Oranges and Honey Tangerine Cornmeal Upside-Down Cake

PAN SCHMEAR
(adapted from Thomas Keller ad hoc at home)
112 g (8 TBSP) unsalted butter, room temperature
1 1/2 TBSP honey
1/2 tsp vanilla extract
217 g (1 cup) firmly packed light brown sugar
pinch kosher salt

5-6 Calamansi
3 each blood oranges and honey tangerines, or any preferred citrus

CAKE
(adapted from Tish Boyle The Cake Book)
161 g (1 1/3 cups) all-purpose flour
150 g (1 cup) yellow cornmeal
200 g (1 cup) granulated sugar
2 tsp baking powder
1/4 tsp salt
3 large eggs
363 g (1 1/2 cups) whole milk yogurt
170 g (3/4 cup) unsalted butter, melted
6 g (1 TBSP) finely grated blood orange zest
15 ml (1 TBSP) freshly squeezed blood orange juice
1 1/2 tsp vanilla extract


Position rack in center of oven and preheat to 350 F degrees.

In bowl of stand mixer fitted with a paddle, combine the butter, honey, vanilla, brown sugar and salt, and beat until smooth and blended. Spread 1/3 cup of the schmear onto the bottom of an 10-inch pan. (Reserve the remaining schmear in the refrigerator for two weeks or a month in the freezer.)

Slice off the tops and bottoms of citrus, place on a clean surface and slice away rind and pith top to bottom following curve of fruit. Slice crosswise into 1/4-inch thick, discard any seeds. Arrange on top of pan schmear in a single, tight layer. Set aside and prepare cake batter.

In a large bowl, whisk together the flour, cornmeal, sugar, baking powder and salt; set aside.

In a medium bowl, whisk together the eggs until blended. Add the yogurt and stir to combine. Add the butter and stir until blended. Add the zest, juice and vanilla extract and whisk to combine.

Using a rubber spatula, fold the wet into the dry ingredients, mixing until just blended. Scrape batter into prepared pan and smooth top.

Bake for 40-45 minutes, until the top is lightly golden and cake test comes out clean. Cool the cake on the wire rack for 10 minutes.

Run a knife around the edges of the cake, invert onto a serving platter and serve.


November 21, 2011

Rocky Road Muffins


Is it just me or does the days going by way too fast? November seemed like it just started but it just hit me Thanksgiving will only be a few days from now. Next thing, Christmas will be around and we'll be welcoming 2012 --Ack, I'm certainly not ready for the holidays just yet.

There's been a whirlwind of events in my family lately: celebrating three birthdays in one week and a 11-11-11 wedding of my little cousin definitely made for a busy household. My busier work schedule this week have definitely made me feel like I can't seem to catch up! So an unexpected weekend off from work was just what I needed to slow down a little, take a deep breath and BAKE!


These Rocky Road muffins were very simple to put together. Chocolate and nuts along with marshmallows were stirred into a chocolaty batter and topped with even more chocolates and nuts; they made for a scrumptious muffin. While I was prepping my ingredients the night before,I realized I didn't have mini marshmallows on hand. I got too lazy and didn't really want to go out in the cold to buy them so figured I make them. Making marshmallows from scratch is really easy (and fun for me, watching my boys trying to handle the sticky goo). I've made marshmallows before, the recipe can be found here.
And apparently my pantry contained all the nuts in the world except walnuts, the ones originally asked for in the recipe. No matter, I just used a little bit of each nuts and even cracked several macadamias to add in there. I really like the result of putting a variety of nuts in these muffins, they gave a different flavor and texture to each bite. I would even go ahead and add more nuts next time I bake these.

So something chocolaty that's not overly sweet you can enjoy first thing in the morning. Truly a great muffin to start the day. Oh, but my family couldn't help themselves, we enjoyed these with a cup of hot cocoa, topped with marshmallows, of course! :)

Rocky Road Muffins

280g (2 2/3 cups) all-purpose flour
15g (1 TBSP) baking powder
5g (1 tsp) salt
15g (3 TBSP) cocoa powder
60g mini marshmallows
75g milk chocolate chips
60g (1/2 cup) nuts
150g (2/3 cup) brown sugar
200g (3/4 cup) milk
2 large eggs
75g butter, melted
  1. Preheat oven 400F degrees. Prepare muffin pan either by greasing or using liners; set aside.
  2. In a large bowl, whisk together the flour, baking powder, salt and cocoa. Stir in the marshmallows and set aside.
  3. Combine the nuts and chocolate chips together. Set aside 1/3 cup and add the remaining to the flour mixture.
  4. In a small bowl, stir together the sugar, milk, eggs and butter. Add to the flour mixture and stir until just combined.
  5. Portion batter into the prepared muffin pan. Sprinkle tops with reserved nut-chocolate chip mixture. Bake for 16-18 minutes.
  6. Remove and let cool on rack for 5 minutes. Then remove from pan and serve.
Muffin Monday is an initiative by Baker Street. A culinary journey of sharing a wickedly delicious muffin recipe every week. Drop in a quick line to join her on her journey to make the world smile and beat glum Monday mornings week after week.

November 16, 2011

Coconut Pandan Chiffon Flan Bundt Cake

I've been thinking for weeks now of what bundt to bake to celebrate National Bundt Day with Mary, The Food Librarian. She has been posting a bundt every single day for thirty days leading up to this food holiday. I've even gone through her archives and round-up from the previous years. Last minute inspiration while thinking about my last year's Ube Chiffon Flan Bundt led me to bake a Coconut Pandan Chiffon Flan Bundt Cake.

Pandan is a tropical plant widely available and used in cooking in Southeast Asia. My Lola always told me to place a pandan leaf in the water when cooking rice to make it special; I would be the one told to cut a leaf off our plant in the backyard. I didn't mind since I know I'm in for something special - just the lovely scent that fills the house as it cook is just heavenly.

I have not had luck finding a pandan plant here in US but the leaves can be found in the frozen section of most Asian stores. Some stores will have fresh leaves once in a while so that's when I stock up. Pandan's flavor matches perfectly with coconut, a popular Filipino dessert is Coconut Pandan Gelatin with strips of young coconut and green cubes of pandan gelatin.

Taking those flavors and putting it in a cake form with added leche flan (and caramel) puts this cake over the top! The smooth, creamy coconut leche flan along with light and airy coconut pandan chiffon cake are like yin and yang textures but with both flavors in harmony.

There are plenty of steps in making the cake but don't let that deter you. I promise it's all worth it!


Coconut Pandan Chiffon Flan Bundt Cake

For Coconut Flan:
1 cup sugar
1/4 cup water
7 egg yolks
1 cup unsweetened coconut milk
1 cup sweetened condensed milk
1 tsp vanilla
pinch salt

For Coconut Pandan Chiffon Cake:
240g (2 cups) all-purpose flour
300g (1 1/2 cups) granulated sugar
15g (1 TBSP) baking powder
5g (1 tsp) salt
7 pandan leaves, chopped into 1-inch pieces
3/4 cup unsweetened coconut milk
125ml (1/2 cup) vegetable oil
7 large eggs, separated
1 tsp. vanilla extract
few drops pandan essence
1/2 tsp. cream of tartar
  1. Make the caramel. Mix sugar and water together in a small saucepan and stir until sugar dissolves. Bring mixture to boil in medium-high heat until golden brown in color. Immediately pour into bundt pan, swirling caramel around until it covers the bottom and sides of pan. (Bundt pan will become hot from caramel, wear protective mitts!) Set aside to cool.
  2. Preheat oven to 325 degrees. Bring a pot full of water to boil needed for bain marie.
  3. In a bowl, stir egg yolks. Add both milks and vanilla extract and salt. Stir to combine completely. Strain mixture to rid of yolk solids and set aside while you prepare the chiffon cake.
  4. In a large bowl, whisk together flour, sugar, baking powder, and salt; set aside.
  5. Place pandan leaves and coconut milk in a blender and puree until all leaves are finely shredded and mixture looks green. Strain through several layers of cheesecloth, squeezing out all the liquid.
  6. Add oil, egg yolks, vanilla and pandan essence to the pandan-coconut mixture. Stir thoroughly to combine. Add to flour mixture and whisk until smooth.
  7. In another large bowl, beat egg whites and cream of tartar using an electric mixer until stiff peaks form. With a rubber spatula, gently fold beaten egg whites into batter, a third at a time, just until incorporated. Set aside.
  8. Pour leche flan mixture into the caramel-lined bundt pan.
  9. Spoon the chiffon cake batter into the bundt pan. DON'T WORRY, THE CHIFFON CAKE BATTER WILL STAY FLOATING ON TOP OF LECHE FLAN. Fill only up to 2 inches from top of pan -- batter will rise as the cake bakes. *You will have leftover chiffon batter, enough to make 6 cupcakes; something to tie you over while your bundt cake chill overnight. :)
  10. Pour boiling water into a bigger roasting pan - this is your bain marie. Place the bundt pan in and bake for 45-50 minutes. Check doneness of cake by inserting toothpick.
  11. Take out of oven and let cool completely.
  12. Cover top with plastic wrap and place in refrigerator to chill at least 4 hours, preferably overnight.
  13. To serve, invert onto a plate and enjoy!
 

October 30, 2011

Pumpkin Marble Streusel Muffins


Chocolate: check. Cream cheese: check. Streusel: check. This week we start the Muffin Monday series on holiday muffins. And what a great muffin to start! All the different components you could ask for in a muffin are all here: rich chocolate flavor and creamy cheese topped with crumbly streusel.

Inspired by all the pumpkin recipes this Halloween season, I added some to the cream cheese. Enjoy!

Pumpkin Marble Streusel Muffins
makes 12 muffins

For Streusel:
30g (1/4 cup) all-purpose flour
72g (1/3 cup) brown sugar
1g (1/4tsp) pumpkin pie spice
28g (2 Tbsp) butter, chilled, cut into 1/2-inch pieces
35g (1/4 cup) cocoa crisp pearls (or chocolate chips)

For Muffins:
240g (2 cups) all-purpose flour
120g (3/4 cup) granulated sugar
5g (1 tsp) baking soda
2g (1/2 tsp) salt
15g (3 Tbsp) cocoa powder
110g (4 oz.) cream cheese, room temperature
122g (1/2 cup) pumpkin puree
2 large eggs, room temperature
125g (1/2 cup) water
80g (1/3 cup) oil
5g (1 tsp) vanilla extract

  1. In a small bowl, combine flour, brown sugar and spice. Add the butter and mix until crumbly. Stir in the cocoa pearls (or chocolate chips). Place in the refrigerator while you prepare muffins.
  2. Preheat oven to 350F degrees. Prepare pan with liners and set aside.
  3. In a large bowl, sift together the flour, sugar, baking soda and salt. Remove half a cup (about 80g) and set aside. Whisk in cocoa to combine. Set aside.
  4. In a medium bowl, beat cream cheese, pumpkin puree, 1 egg and half cup of flour until smooth. Set aside.
  5. In a small bowl, combine the other egg, water, oil and vanilla. Add to the large bowl of cocoa-flour mixture (from Step 3).
  6. Spoon cocoa-flour and cream cheese pumpkin mixtures side by side into pans.
  7. Sprinkle tops with prepared streusel.
  8. Bake for 20-25 minutes or it passes the toothpick test.
Muffin Monday is an initiative by Baker Street. A culinary journey of sharing a wickedly delicious muffin recipe every week. Drop in a quick line to join her on her journey to make the world smile and beat glum Monday mornings week after week.

LinkWithin

Blog Widget by LinkWithin