Showing posts with label Vegetables. Show all posts

October 30, 2011

Pumpkin Marble Streusel Muffins


Chocolate: check. Cream cheese: check. Streusel: check. This week we start the Muffin Monday series on holiday muffins. And what a great muffin to start! All the different components you could ask for in a muffin are all here: rich chocolate flavor and creamy cheese topped with crumbly streusel.

Inspired by all the pumpkin recipes this Halloween season, I added some to the cream cheese. Enjoy!

Pumpkin Marble Streusel Muffins
makes 12 muffins

For Streusel:
30g (1/4 cup) all-purpose flour
72g (1/3 cup) brown sugar
1g (1/4tsp) pumpkin pie spice
28g (2 Tbsp) butter, chilled, cut into 1/2-inch pieces
35g (1/4 cup) cocoa crisp pearls (or chocolate chips)

For Muffins:
240g (2 cups) all-purpose flour
120g (3/4 cup) granulated sugar
5g (1 tsp) baking soda
2g (1/2 tsp) salt
15g (3 Tbsp) cocoa powder
110g (4 oz.) cream cheese, room temperature
122g (1/2 cup) pumpkin puree
2 large eggs, room temperature
125g (1/2 cup) water
80g (1/3 cup) oil
5g (1 tsp) vanilla extract

  1. In a small bowl, combine flour, brown sugar and spice. Add the butter and mix until crumbly. Stir in the cocoa pearls (or chocolate chips). Place in the refrigerator while you prepare muffins.
  2. Preheat oven to 350F degrees. Prepare pan with liners and set aside.
  3. In a large bowl, sift together the flour, sugar, baking soda and salt. Remove half a cup (about 80g) and set aside. Whisk in cocoa to combine. Set aside.
  4. In a medium bowl, beat cream cheese, pumpkin puree, 1 egg and half cup of flour until smooth. Set aside.
  5. In a small bowl, combine the other egg, water, oil and vanilla. Add to the large bowl of cocoa-flour mixture (from Step 3).
  6. Spoon cocoa-flour and cream cheese pumpkin mixtures side by side into pans.
  7. Sprinkle tops with prepared streusel.
  8. Bake for 20-25 minutes or it passes the toothpick test.
Muffin Monday is an initiative by Baker Street. A culinary journey of sharing a wickedly delicious muffin recipe every week. Drop in a quick line to join her on her journey to make the world smile and beat glum Monday mornings week after week.

October 3, 2011

Zucchini Sesame Seed Muffins

I am pleased to welcome another week with a delicious muffin baked along the Muffin Monday bakers. This time, we give you a savory one. I have been looking forward each week to getting Anuradha's recipe, secretly hoping it will be a savory one. :)  It has been awhile since we offered Spinach Feta Muffins. We used zucchini this time mixed in with your herbs of choice, along with sesame seeds for a nutty crunch.


I used black sesame seeds to give the muffins a contrast in color and loved the results. My family loved them also though next time I would be more generous with my use of herbs. Maybe even use fresh ones.

Zucchini Sesame Seed Muffins
makes 12 regular-sized  muffins

(original recipe found in the book 1 Mix, 100 Muffins)

300g (about 2 medium) zucchini
240g (2 cups) all-purpose flour
1 TBSP baking powder
1/8 tsp salt
freshly ground pepper
2 TBSP sesame seeds (plus extra for sprinkling on top)
1/2 tsp dried mixed herbs (I used cumin & oregano)
2 large eggs, slightly beaten
240g (1 cup) plain yogurt
3 TBSP oil
3 TBSP butter, melted

Preheat oven to 400F degrees. Grease muffin tin with pan spray or use liners.
Grate zucchini, squeezing out excess moisture, set aside.
In a medium bowl whisk together flour, baking powder, salt, pepper, sesame seeds and herbs.
In another bowl, combine eggs, yogurt, oil and butter.
Add liquid into the dry ingredients. Stir quickly but lightly until combined.
Place into muffin tins. Bake for 18-20 minutes.
Transfer to cooling rack for about 5 minutes. Then remove from pan. Serve warm.


Muffin Monday is an initiative by Baker Street. A culinary journey of sharing a wickedly delicious muffin recipe every week. Drop in a quick line to join her on her journey to make the world smile and beat glum Monday mornings week after week.

September 26, 2011

Carrot Spice Muffins


I am not much of a fan of carrot cakes so was surprised to find these carrot spice muffins to my liking.

A healthy recipe using whole wheat flour and warmed up by spices that evoke Autumn. I liked that you can either use brown sugar or honey to sweeten it though decided to try agave syrup since I've been wanting to try baking with it. You may also use buttermilk or yogurt plus even more choices either using oil, melted butter or applesauce. I opted to use yogurt and applesauce since I just have made them earlier in the week.

I also added crushed pineapples in lieu of raisins plus cashews for crunch. I originally thought of adding a glaze but the muffins were sweet enough that decided they didn't need them. These were baked for our afternoon snack, hoping some will last for next day's breakfast. But of course that didn't happen.


Carrot Spice Muffins
makes 12 standard size muffins

The recipe is from Whole Foods for The Whole Family by La Leche League International Cookbook and can be found here.

180g (1 1/2 cups) white whole wheat flour
5g (1 tsp) baking soda
5g (1 tsp) baking powder
3g (1/2 tsp) coarse salt (optional)
2g (1/2 tsp) ground cinnamon
1g (1/4 tsp) nutmeg
pinch (1/8 tsp) ground ginger
pinch (1/8 tsp) allspice (I omitted this one)
108g (1/3 cup) agave syrup (or honey or brown sugar)
1 egg, room temperature
120g (1/2 cup) yogurt
80g (1/3 cup) applesauce
3g (1/2 tsp) vanilla
175g (1 1/2 cups) finely grated carrots
150g (1/2 cup) crushed pineapple
64g (1/2 cup) chopped cashews

Preheat oven to 400F. Prepare muffin tray either by using paper liners of pan spray.
In a large bowl, whisk together flour, baking soda, baking powder, salt (if using) and spices.
In another bowl, beat eggs with agave syrup, yogurt, applesauce, vanilla, grated carrots, pineapples and cashews.
Add wet ingredients to the dry, stir gently until it comes together.
Divide among 12, about three-quarters full. Bake for 15-17 minutes or until it pass toothpick test.
Remove from pan immediately and let muffins cool on rack for few minutes before serving.

Muffin Monday is an initiative by Baker Street. A culinary journey of sharing a wickedly delicious muffin recipe every week. Drop in a quick line to join her on her journey to make the world smile and beat glum Monday mornings week after week.

September 25, 2011

Salted Duck Egg and Tomato Salad


Itlog na Maalat (salted duck eggs) and kamatis (tomatoes): the quintessential Filipino side dish. Though labeled as a salad, it is not eaten before the main meal customary in Western dining. It's more considered a side dish to be eaten along with your ulam (viand) and of course, steamed rice.


A few months ago in Spring, the egg vendor at my farmers market was selling duck eggs so thought I'd give it a try making my own itlog na maalat. I went to research and found this great pictorial on the photo blog My SariSari Store about the process of making salted duck eggs in the Philippines (there are four parts).

Though chicken eggs may also be used, duck eggs are traditionally used for their bigger size and fatty yolks. Commercially-prepared salted eggs are also brined in mud! Dirt and water mixed along with salt are used to brine the duck eggs for about 3 weeks. Though my sons would gladly approve of any opportunity to "cook" in the mud I think it'll be one messy project!

Thank goodness there is another, less messy, way which is to just soak the eggs in saltwater. It would make sense to use sea salt and not the common table which has iodine. I ended up using two cups of salt dissolved in six cups of water. The porous eggs shells will absorb the salt from the water and flavor the eggs inside. Osmosis at work and my sons got a science lesson out of it. ;)


You also need a little bit of patience for they take about three to four weeks to cure. And since fresh eggs float in the water, you need something heavy on top to keep the eggs totally submerged in the saltwater. A plate or a sealed food-storage bag filled with water placed on top will work fine. Keep the container with your eggs and saltwater in a cool place, I kept mine at the bottom shelf in my pantry. I boiled one egg for ten minutes to test for my preferred saltiness. If you think the eggs achieved the right salty flavor, just boil the rest. If not, just keep soaking them for a few more days, for up to a week.

I was not able to take pictures in-process but I believe it's easy and straightforward. The last three eggs you see here are ones I made all the way back on Easter, enjoyed with the Summer's ripest tomatoes. So you can see, once you cooked them, they keep for a long time in the refrigerator. Now I want to make more.

I've actually been asking my egg vendor for more duck eggs. My egg vendor told me he had been collecting eggs from his ducks but was not comfortable selling them to me due to the summer heat. And now with Autumn's arrival, the ducks have slowed their egg production.

This is my entry for this month's Kulinarya, the challenge: red, white, blue and yellow -- colors of the Philippine flag.  So you thinking where's the blue: the egg shells of course!

August 26, 2011

Shrimp Stuffed Squash Blossoms


It's Friday! The weekend's finally here. For me, that means going to the farmers market -- one of the things I look forward to all week.

Though, weekends are also lazy days at home so my family and I never get to the market as early as we would like. That means missing out on squash blossoms for these beautiful flowers always sell quickly. It seems like I've been on a hunt for squash blossoms all summer. I have already given up for the season but finally lucked out last Sunday.


Since I had to report to work in the afternoon (yeah, I'm working a little this month), I went earlier than my usual time. The market was already packed. I noticed one vendor had an unusually long line forming so nosy me had to see what the fuss was about. There on his stall was a small basket now only half-filled with squash blossoms. So I quickly went in line, wished while I waited that they'll still be some left when I get my turn. I got a dozen flowers and almost bought them all but I felt sorry for the people behind me so left the other dozen behind.


I had already planned on cooking Camaron Rebozado (Battered Shrimp) for lunch after our shopping that day. But my surprise ingredient changed my cooking plans, for the better. I remember reading Ellie's recipe for Prawn Mousse-Filled Zucchini Flower Tempura a few months back and made a mental note to make them when squash season starts. I added some scallions in there just because that's how I remembered my mother making Camaron Rebozado for me.


Shrimp Stuffed Squash Blossoms

12 squash blossoms
320 g (about 2/3 lb.) shrimp, peeled, deveined and chopped
1 scallion, white part only finely chopped
1/2 tsp salt
1/4 tsp pepper
1/2 tsp sesame seed oil, optional
1 egg white, lightly beaten
oil, for frying

Frying Batter:
1 egg yolk, beaten
350 ml ice-cold water
200g flour

1. Prepare the blossoms. Swish them in a bowl of cold water, then shake them dry. Carefully snap the stamen off. Set the blossom aside.

2. Make the filling: Place shrimp, scallion, salt, pepper (and sesame oil, if using) in the food processor and pulse until it forms a paste. Add egg white and process until it comes together, about 20 seconds.

3. Spoon filling in a piping bag (I used a food storage bag with corner snipped off). Carefully pry open the flower petals and pipe about a tablespoon and a half of filling in each blossom.

4. Prepare the batter. In a bowl, combine egg yolk, water and flour. Do not over mix

5. Heat oil to 350C degrees. Holding the stems, quickly dip the blossoms in the batter and fry a few at a time for 2-4 minutes, or until it is golden brown and inside is cook through.

6. Continue frying until all are done. Serve immediately.

Notes: The batter makes plenty so we fried our other farmers market goodies as well: whole scallions, broccoli, green beans. Have fun and have a tempura party :)


These were a delicious way of enjoying squash blossoms. My sons wanted to eat more I wished I did buy all the squash blossoms. Hopefully this weekend luck is on my side again.


Check out Jun Belen's blog for the classic Camaron Rebozado recipe.

Another Filipino Squash Blossom recipe (filled with longanisa! Yum) by Marvin of Burnt Lumpia

Ellie, previously of Almost Bourdain is now Gourmand Recipes, please check her site.

August 7, 2011

Spinach Feta Muffins for Muffin Monday


I always think of something sweet when muffins are mentioned so I'm glad to bake these savory Spinach Feta Muffins for this week's Muffin Monday. Along with spinach and feta cheese, sun-dried tomatoes and more cheese (Parmesan) are also baked in. An easy recipe to put together; I've already made plans to bake them again this week.


When I first received the recipe, right away it reminded me of Spanakopita, the classic spinach pie from Greece baked in phyllo (filo) pastry, so I decided to bake them in phyllo. I already knew they will turn out great since I've already baked cupcakes in phyllo pastry before. I've cut 5-inch squares out of phyllo and used a double layer for each muffin.


Just make sure to carefully remove the muffins from the pan right away. The heat from the pan will create moisture and give your muffins soggy bottoms!


Spinach Feta Muffins
makes 12

The original recipe can be found Taste.com.au which required using self-rising flour. You do not need to buy this since it is easy to make your own. Just add a teaspoon of baking powder and a 1/4 teaspoon of salt for every cup of flour.


350g (2 1/2 cups) all-purpose flour
12g (2 1/2 tsp) baking powder
5g (1/2 tsp) salt
220g (about a bunch) spinach, trimmed, washed, dried & shredded
150g feta cheese, crumbled
85g (about 1/2 cup) sun-dried tomatoes, julienned (I used a whole package from Trader Joe's)
2 TBSP Parmigiano Reggiano, finely grated
330ml (1 1/3 cups) milk, room temperature
90g (7 TBSP) butter, melted
1 large egg, room temperature
24 pieces 5-inch squares phyllo dough
butter for brushing pans and phyllo
Parmesan cheese for sprinkling

Preheat oven to 375F degrees.
In a large bowl, sift flour, baking powder and salt.
Add spinach, feta, tomatoes and Parmesan cheese and stir to combine. Set aside.
In a small bowl, mix butter, butter and egg until well combined. Set aside.
Prepare muffin pans. Lightly brush pan with butter. Working quickly, line each with one square of phyllo. Sprinkle with Parmesan cheese, about 1/4 tsp each. Add another layer of phyllo.
Add milk mixture to flour mixture and stir until just combined, do not over mix.
Spoon into prepared pans. Sprinkle tops with more Parmesan, if desired.
Bake for 18-20 minutes or until toothpick inserted comes out clean.
Let cool in pan for about 2 minutes then carefully remove muffins and set on rack to cool.
Sprinkle even more Parmesan if you like. Enjoy warm or may be served at room temperature.


Muffin Monday is an initiative by Baker Street. A culinary journey of sharing a wickedly delicious muffin recipe every week. Drop in a quick line to join her on her journey to make the world smile and beat glum Monday mornings week after week.

This week's Muffin Monday Bakers. Please check out their creations:
An Baker Street
Xai  xai eats a lot
Jasmine CookThatBook
Kristen Mind Your trees and Bees
Elizabeth Asian in America

March 20, 2011

Munggo Guisado for Kulinarya Cooking Club


Thank you to Erika of Ivory Hut for choosing vegetables for our Kulinary Cooking Club theme this month. Many choices came up and I wanted to cook them all, from the classic Pinakbet (Filipino Vegetable Stew) to Adobong Sitaw, my favorite way of preparing string beans to Tortang Talong (Eggplant Omelet), a simple two-ingredient dish that my kids adore.

So cook I did but one major problem: no pictures! One dish was eaten up right away so there were no leftovers for a pictorial. For the other dish, I made sure to make plenty and had set it aside but come to find out the camera had no battery! By the time I got around to getting batteries, sadly the dish was all eaten. The last dish I just completely forgot to take pictures. I know, bad food blogger! ;)


So down the wire, last night I thought of something simple I can prepare today. Luckily, I have most of the ingredients I needed, plus I got to cook something perfect on this cold, rainy day: Munggo Guisado, a soup made of mung beans. This dish comes about fairly quick since the beans are so small, they only take minutes to boil. A quick saute of garlic, onions and tomatoes (the trinity of Filipino cooking) along with shrimp makes this a quick meal.


I remember having to pick malunggay (moringa) leaves off one by one and adding them at the end of cooking. I have not seen any but found spinach as a good substitute. Now thinking arugula would be great as well.

I've also topped my dish with chicharon (pork cracklings) which my family always does when we eat Munggo Guisado. When I mentioned this to my husband, he went out in the rain to get some. :)  This is totally optional and usually omitted during Lent when we served this on meatless Fridays. Tinapa (smoked fish), or even just fried fish goes great with this. Also, Paksiw na Bangus (Milkfish stewed in Vinegar) is my parent's favorite to eat with this. I have not eaten that in years so of course, now I'm craving it! :)


Munggo Guisado
(makes 6-8 servings)

2 cups dried mung beans
1 lb. shrimp (with heads) peeled & deveined, (head & peels reserved)
2 TBSP vegetable oil
2 cloves garlic, finely minced
1 small onion, finely chopped
1 large tomato, chopped
1 TBSP bagoong alamang (shrimp paste)
1 bunch spinach (or arugula)
chicharon (optional)

Pick through the mung beans for debris, rinse in water and place in pot. Fill to about an inch of water and let it boil over high heat. Once it boils, lower heat and let it simmer until beans are tender, 20-25 minutes. Stir occasionally and add water as needed.

Once beans are boiling, make shrimp stock. Place reserved shrimp trimmings in small pot and add 2 cups of water. Let it boil then simmer for about 10-15 minutes. Strain through a fine sieve and reserve broth.

In a large saucepan or Dutch oven, heat oil over medium-high heat. Add garlic and cook quickly until fragrant, about 30 seconds. Add onions and cook 2-3 minutes until soft and translucent, do not brown. Add tomatoes and continue to cook, smashing them to give off the juice. Cook for 2-3 minutes or until sauce thickens.

Add the bagoong and stir a few seconds until it is fragrant ;) Then add the shrimp, stirring to get the shrimp coated with the tomato mixture. A soon as the shrimp is starting to turn pink and opaque, pour in the boiled mung beans and shrimp stock. Turn heat up high and let it boil quickly.

Once it boil, turn off heat and add the spinach and stir. There will be enough heat to wilt spinach (also prevents  overcooking). Serve hot.


Please visit my fellow Kulinarya members for their Vegetables creations:

Kath - http://www.acupcakeortwo.com/
Trisha - http://sugarlace.com/
Trissa - http://trissalicious.com/
Olive - http://www.latestrecipes.net/
Ninette - http://bigboldbeautifulfood.blogspot.com/
Peach- http://www.thepeachkitchen.com/
Althea- http://www.busogsarap.com/
Asha - http://forkspoonnknife.blogspot.com/
Malou - http://www.skiptomalou.net/
Cherrie - http://sweetcherriepie.blogspot.com/
Acdee - http://acdee.blogspot.com/
Valerie - http://www.acanadianfoodie.com/
Sheryl - http://crispywaffle.com/
Divina - http://www.sense-serendipity.com/
Anna - http://www.anniesfoodjournal.blogspot.com/
Dahlia - http://www.energychef.blogspot.com/
Joy - http://joyjoycreativeoutlet.blogspot.com/
Maribel - http://www.foodgeek.webs.com/
Tressa
Jen - http://www.jen-at-work.blogspot.com/
Pia - http://bisayajudkaayo.blogspot.com/
Malaka - http://thegrandinternational.com/.
Mimi - http://lapinchecocinera.blogspot.com/
Erika - http://ivoryhut.com/
Kat - http://www.caterersearch.com/tabletalk/default.aspx
Lala - http://thislittlepiggywenttothemarket.blogspot.com/
Selfie - http://eats.sefiebee.com/
Connie Veneracion - http://homecookingrocks.com/
Oggi - http://oggi-icandothat.blogspot.com/
Katrina Kostik - http://lardonmyfrench.blogspot.com/
Rochelle Ryan - http://www.whydiss.blogspot.com/
Marica - http://cuppycreme.blogspot.com/
Diona - http://titaflips.blogspot.com/
Rowena - http://saraplicious.blogspot.com/

November 21, 2010

Rellenong Bangus (Stuffed Milkfish) for Kulinarya Cooking Club


This month marks the first year anniversary of Kulinarya Cooking Club. Thanks to Kath, Trish and Trissa, all the way across the globe in Australia, for starting a group that highlights our colorful Filipino cuisine. To mark this special occasion, Anna and Dahlia chose a festive theme to celebrate: Relleno, a term for stuffed food like chicken, fish, crab or vegetables.


I made Rellenong Bangus (Stuffed Milkfish), one of my favorite dishes growing up. This type of fish is perfect for stuffing due to the thicker skin (just like salmon skin) but the drawback is that milkfish has more bones. Besides the vertebral spine, there are teeny tiny bones along the lateral and ventral sides. This is the reason Rellenong Bangus is a dish considered by many as a "special occasion" dish due to the laborious preparation that goes into the dish. When I say laborious, I only meant one thing: picking out the fish bones! I know this from experience because I was always the one who had to help pick them out. I didn't mind because my Mom would reward me with the best slice: the one with the fish belly, yum! :)


I decided to try something different in preparing my family's Rellenong Bangus recipe by starting with a boneless milkfish; a short-cut to avoid the dreaded bone picking. Most Asian markets now offer boneless milkfish (usually found in the frozen aisle), just make sure to buy ones that has not been marinated. A minor drawback is the fish still have their scales on but given the choice between bones or scales, it is easier to scale the milkfish (just takes minutes) than picking out the bones (may take hours).


Then it is just a matter of scraping out the meat. Setting aside the fish bodies to marinate in some soy sauce and kalamansi (or lemon). Saute the fish meat with onions, garlic, carrots, red bell pepper, raisins and seasoned with some soy sauce. Remove from heat and let it cool. (The cooling process is usually when you would go over the mixture to pick out the bones which can take hours.) I put the mixture in the freezer for about half an hour to speed the process. Once cool, mix in eggs and bread crumbs to help bind together when you put it back in the fish cavity.
 
Look no fish bones! :)
Then it is just a matter of frying or baking the fish until the skin is cooked through. This way of making Rellenong Bangus has been so easy that I won't need a special occasion to make my favorite dish. :)


Rellenong Bangus

2 milkfish, preferably deboned, thawed
2 TBSP soy sauce
2 TBSP freshly-squeezed kalamansi juice (or lemon)

1 medium onion, finely minced
1 clove garlic, finely minced
1/2 red bell pepper, finely minced
1/2 cup green peas, thawed
1/3 cup raisins
2 TBSP soy sauce
1 egg, slightly beaten
1/2 cup bread crumbs
oil, for frying

Prepare fish. Scale and rinse, pat dry. With a spoon, scrape meat off the skin, leaving belly intact. Put fish meat in a bowl, season with salt and set aside.

Place fish bodies in bowl along with soy sauce and kalamansi juice. Place in refrigerator to chill while you cook the fish meat.

Heat oil in pan over medium heat. Add onions and garlic, saute until translucent, do not let it brown. Add carrots and cook for about 2 minutes until soft. Add the fish meat and saute until meat become opaque, about 5 minutes. Season with salt and pepper. Add bell pepper, peas and raisins until heated though (the raisins would have soak some of the liquid the fish gave out). Take from heat, transfer to a bowl and let mixture cool.


Spoon the fish mixture into the fish and close it back. The seams were sewn together by using a regular needle and cotton thread. Lightly dredge the whole fish in cornstarch before frying it in a wok-ful of hot oil (350F). Fry until the skin is golden brown and crisp, about 5 minutes on each side.

Alternatively, you may bake the rellenong bangus in a 350F degree oven. Wrap the fish with a greased tinfoil, for about 40-45 minutes. Unwrap and broil to get some color in the skin. Though you won't get the crunchy skin when fried.

Please visit my fellow Kulinarya members for their Relleno creations:

Kath - http://www.acupcakeortwo.com/
Trisha - http://sugarlace.com/
Trissa - http://trissalicious.com/
Olive - http://www.latestrecipes.net/
Ninette - http://bigboldbeautifulfood.blogspot.com/
Peach- http://www.thepeachkitchen.com/
Althea- http://www.busogsarap.com/
Asha - http://forkspoonnknife.blogspot.com/
Malou - http://www.skiptomalou.net/
Cherrie - http://sweetcherriepie.blogspot.com/
Acdee - http://acdee.blogspot.com/
Valerie - http://www.acanadianfoodie.com/
Sheryl - http://crispywaffle.com/
Divina - http://www.sense-serendipity.com/
Anna - http://www.anniesfoodjournal.blogspot.com/
Dahlia - http://www.energychef.blogspot.com/
Joy - http://joyjoycreativeoutlet.blogspot.com/
Maribel - http://www.foodgeek.webs.com/
Tressa
Jen - http://www.jen-at-work.blogspot.com/
Pia - http://bisayajudkaayo.blogspot.com/
Malaka - http://thegrandinternational.com/.
Mimi - http://lapinchecocinera.blogspot.com/
Erika - http://ivoryhut.com/
Kat - http://www.caterersearch.com/tabletalk/default.aspx
Lala - http://thislittlepiggywenttothemarket.blogspot.com/
Selfie - http://eats.sefiebee.com/
Connie Veneracion - http://homecookingrocks.com/
Oggi - http://oggi-icandothat.blogspot.com/
Katrina Kostik - http://lardonmyfrench.blogspot.com/
Rochelle Ryan - http://www.whydiss.blogspot.com/
Marica - http://cuppycreme.blogspot.com/
Diona - http://titaflips.blogspot.com/
Rowena - http://saraplicious.blogspot.com/

November 15, 2010

Ube Chiffon Flan Bundt Cake


If you ask a Filipino what their favorite dessert is, more than likely their answer would be Leche Flan and/or anything with Ube (Purple Yam). I love them both so I didn't hesitate to put them together in this dessert so you get to enjoy two sweets at once: Ube Chiffon Flan Bundt Cake.

I first learned about the awesomeness that is Flan Cake from Tracey of Tangled Noodle last year when she posted her birthday cake recipe that combined a creamy coconut flan atop an airy mocha chiffon cake. I never even thought this was possible. Sure, I've added cream cheese to my flan before that resulted in Leche Flan Cheesecake. But this combined two totally different flavors and textures; and somehow both layers complemented each other. Very awesome.

I used my Leche Flan recipe and Banana Chiffon Cake recipe substituting ube for the banana. Well, technically I didn't use ube in this recipe since fresh ube is not available in the US. So for this flan cake, I used purple sweet potato (sometimes called Okinawan sweet potatoes) that I oven-roasted until cooked through and put through a ricer. As noted by Jun-Blog, purple sweet potatoes make a worthy substitute for ube. (And while I am being technical here, those orange-fleshed tubers sold as yams are NOT but really belong in the sweet potato family. A wiki search on yam explains more. Also, ube is not the same as taro.) If purple sweet potatoes cannot be found, I'm sure imported prepared ube halaya (in jars, available in Asian markets) can be used.

While preparing the chiffon cake batter, I was disappointed to see the vibrant purple color of the sweet potatoes turn into yucky cement-color gray when mixed with the yellow yolks so I resulted to adding in several drops of ube extract to recover some of the color and I'm sure this added even more ube flavor. The usual chiffon cake recipe makes for one bundt cake. The addition of flan to the pan means less cake batter so this recipe yielded me one big bundt cake and a smaller llanera (flan mold).


Ube Chiffon Flan Bundt Cake

For Flan:
2 cups sugar
1/2 cup water
12 egg yolks
1 can evaporated milk
1 can sweetened condensed milk
1 tsp vanilla
pinch salt

For Ube Chiffon Cake:
2 cups all-purpose flour
1 1/2 cups granulated sugar
1 Tbsp. baking powder
1 tsp. salt
2 medium purple sweet potatoes, roasted and passed through ricer, 3/4 cup
1/2 cup vegetable oil
7 large eggs, separated
1 tsp. vanilla extract
1 Tbsp. Ube extract
3/4 cup cold water
1/2 tsp. cream of tartar

Make the caramel. Mix sugar and water together in a small saucepan and stir until sugar dissolves. Bring mixture to boil in medium high heat until golden brown in color. Then pour into bundt pan and llanera. Swirl caramel around until it covers the bottom and sides of pan. Set aside to cool.
Preheat oven to 325 degrees. Bring a pot full of water to boil needed for bain marie.
In a bowl, stir egg yolks. Add both milk and vanilla extract and salt. Stir to combine completely. Pour mixture through a strainer and set aside while you prepare the chiffon cake.

In a large bowl, whisk together flour, sugar, baking powder, and salt; set aside.In a medium bowl, place sweet potatoes, add oil, egg yolks, vanilla, ube extract and water; mix to combine. IF UBE IS LUMPY, PASS MIXTURE THROUGH A FINE STRAINER. Add to flour mixture and whisk until smooth.
In another large bowl, beat egg whites and cream of tartar using an electric mixer until stiff peaks form. With a rubber spatula, gently fold beaten egg whites into batter just until incorporated. Set aside.

Pour about 2 cups of leche flan mixture into the caramel-lined bundt pan. Put the remainder (about 1 cup) into the llanera.

Spoon the chiffon cake batter into the bundt pan. DON'T WORRY, THE CHIFFON CAKE BATTER WILL STAY FLOATING ON TOP OF LECHE FLAN. Fill only up to 2 inches from top of pan. Pour remaining batter in the llanera.

Pour boiling water into a bigger pan that would fit both the bundt and llanera. This is your bain marie, place the cake pans in and bake for 30 minutes. Check doneness of cake by inserting toothpick; the llanera should be ready since it smaller. Take out to cool. The bundt will need another 15-25 minutes. Check doneness by using toothpick. Take out of oven and let cool completely.
Cover top with plastic wrap and place in refrigerator to chill at least 4 hours, preferably overnight.
To serve, invert onto a plate and enjoy!


November 15 is National Bundt Day. Mary, The Food Librarian has been celebrating for a month, posting one bundt each day leading to this day. She had invited her readers to celebrate with her by posting a bundt cake - I'm glad to join the celebration!

October 25, 2010

Suman na Kamoteng Kahoy (Cassava Steam Cake) for Kulinarya Cooking Club

The Kulinarya Cooking Club chose to highlight Suman this month. Suman are Filipino cakes that are wrapped in leaves and steamed. Every town or region have their own specialty. Most suman are usually made with glutinous rice and cooked in coconut milk. Some suman recipes require the rice to be soaked, even treated with lye, before being rolled in leaves. Banana leaves are usually used to wrap them into little logs before it goes to cook in a steamer. Other wrappings used are palm fronds or sometimes even placed inside a bamboo node. But definitely all suman are steamed.

Thanks to Sheryl and Divina for choosing suman this month. If it weren't for them, I would not have stepped out of my comfort zone and tried cooking suman from scratch.My family never bothered to make suman at our home since my mother knows plenty of friends that make them. Even though my family makes biko, puto, espasol and other kakanin, growing up I never saw suman being made at home which made me believe special wrapping skills is needed to pull it off. (Though my research showed me one that is: Suman sa Ibus, even my Mom confirmed it yesterday when I came over her house to make my suman.)

I hope to work myself to that level but first, let's start with something that would be the easiest to start with. I didn't use glutinous rice either with my suman. Only four ingredients were used in this suman: grated cassava, grated mature coconut, sugar and banana leaves. Even easier, the ingredients can be found in the freezer aisle of your local Asian grocer.

Suman na Kamoteng Kahoy
makes about 20

banana leaves
2 bags (1-lb each) frozen grated fresh cassava, thawed (about 4 cups)
1 bag (1-lb.) frozen mature coconut, thawed (about 2 cups)
1 cup granulated sugar

Prepare banana leaves. Wipe down both sides of leaves with damp towel. Cut into 9" by 9" square. Turn stovetop and pass leaves through the heat until it wilts slightly. This makes the leaves more pliable and resistant to cracks when rolling the suman. Be careful, the leaves will steam and turn darker as they are heated.

Prepare steamer by putting water to boil. While waiting, combine the cassava, coconut and sugar in a large bowl until thoroughly mixed. Spoon about 2-3 tablespoons of cassava mixture on center of banana leaf. Fold over the mixture with one end and roll over. Tuck the ends under and place on its seam. Put in steamer with the water in rolling boil for about 30 minutes. Let it stand to cool, about 10 minutes. You may serve warm or room temperature.


These suman were a success at my Mom's house. Everyone wanted several and was quite impressed that I made them from scratch. I had my mom watching over my shoulders the whole time but I think she approved since I saw her sneak another one to eat for later. :)  The banana leaves add a nice hint of flavor to the suman, it had a strong smell coming out of the steamer but mellowed out when it cooled. If banana leaves are not available, you may roll them in foil (as my mother suggested) or just spoon them into small cups for steaming. Though they won't be called suman anymore but called Pasingaw (to steam) which I realized I posted on it a couple of years back.

I managed to save a few for breakfast this morning and my boys ate them with some leftover ganache. They come up with great ideas, the ganache put them over the top! Next time, I will even use fresh cassava and coconut -- I'm sure the flavor would be even better!

Kulinarya was started by a group of Filipino foodies living in Sydney, who are passionate about the Filipino culture and its colorful cuisine. Each month we will showcase a new dish along with their family recipes. By sharing these recipes, we hope you find the same passion and love for Filipino Food as we do.


Please visit my fellow Kulinarya members for their Suman creations:

Kath - http://www.acupcakeortwo.com/
Trisha - http://sugarlace.com/
Trissa - http://trissalicious.com/
Olive - http://www.latestrecipes.net/
Ninette - http://bigboldbeautifulfood.blogspot.com/
Peach- http://www.thepeachkitchen.com/
Althea- http://www.busogsarap.com/
Asha - http://forkspoonnknife.blogspot.com/
Malou - http://www.impromptudiva.com/
Cherrie - http://sweetcherriepie.blogspot.com/
Acdee - http://acdee.blogspot.com/
Valerie - http://www.acanadianfoodie.com/
Sheryl - http://crispywaffle.com/
Divina - http://www.sense-serendipity.com/
Anna - http://www.anniesfoodjournal.blogspot.com/
Dahlia - http://www.energychef.blogspot.com/
Joy - http://joyjoycreativeoutlet.blogspot.com/
Maribel - http://www.foodgeek.webs.com/
Tressa
Jen - http://www.jen-at-work.blogspot.com/
Pia - http://bisayajudkaayo.blogspot.com/
Malaka - http://thegrandinternational.com/.
Mimi - http://lapinchecocinera.blogspot.com/
Erika - http://ivoryhut.com/
Kat - http://www.caterersearch.com/tabletalk/default.aspx

August 22, 2010

Lumpiang Sariwa for Kulinarya Cooking Club

The Kulinarya theme chosen by Malou and Cherrie for this month is Lumpia, the Filipino version of springrolls. Since I have already featured Lumpiang Shanghai before, I thought of making something different: Lumpiang Sariwa.

The word sariwa means fresh in Tagalog which implies the freshness of the ingredients. This lumpia also got their name because they are not fried. Instead of using thin rice paper wrappers for rolling, delicate egg-y, crepes are used.


I am featuring my basic recipe for Lumpiang Sariwa here. Besides the initial saute of onions and garlic, this recipe consists of only four vegetables: sweet potato, carrots, green beans and mushrooms. I did this to show how easy this recipe can be. Once you get the hang of it, you could add other vegetables to your liking like cabbage, bean sprouts, singkamas (jicama), sayote (chayote squash), or even garbanzo beans. As the name imply, fresh also means using produce that are available in the season. My visit to farmers market lately showed crisp-tender green "Bagiuo" beans and unblemished shiitake mushrooms. Feel free to use any or all of the vegetables I mentioned here.

I also purposely left out any meat in this dish because I wanted to show there are dishes in Filipino cuisine that are cooked without them. You may add ground pork, shrimp, shredded chicken and/or tofu if you like for a more substantial Lumpiang Sariwa. However, this recipe cannot be called vegetarian since I use chicken broth to boil the vegetables which would then be used to make the sweet sauce. If you truly want a vegetarian lumpia, just use water or vegetable stock. I have yet to try so please let me know if you do.

Now, isn't Lumpiang Sariwa not only wholesome but a versatile dish, as well?


One last thing: For times when you are feeling lazy or just don't want to be bothered by making lumpia wrappers, no need to worry, you can still enjoy these. Just spoon them onto fresh lettuce and eat them just like that! (Just like those lettuce cups that are so popular right now.) But make sure to call them Lumpiang Hubad. The word hubad means "naked" - a play on words but pretty straightforward, I think. :)


Lumpiang Sariwa
makes about 10

For the wrappers:
2 eggs
1 cup water
2 TBSP vegetable oil
pinch salt
3/4 - 1 cup flour

For the filling:
1 TBSP vegetable oil
1 medium onion, thinly sliced
2 cloves garlic, finely minced
1 medium sweet potato, julienned
6 shiitake mushrooms, sliced
2 medium carrots, julienned
1/2 pound green beans, diagonally sliced
1 TBSP soy sauce
2 cups chicken broth

For the sauce:
reserved broth from above
1/3 cup dark brown sugar
2 TBSP dark soy sauce
2 tsp cornstarch

For the assembly:
lettuce leaves
garlic, finely minced
peanuts, crushed


Make the wrappers:
In a medium bowl, whisk together the eggs, water, salt and oil. Strain flour through the sieve and over the egg mixture. Mix until no lumps appear.

Heat a crepe pan or non-stick skillet over low flame. Ladle 1/4 cup of batter and swirl, covering the bottom of pan. Cook for about 2 minutes then turn over and cook another minute. Remove and let cool.

Continue until all batter is used. You may stack together. Keep them covered to prevent drying out.


Make the filling:
Heat oil in wok (or large saute pan) over high heat. Cook onions until limp, about a minute. Add garlic and cook until fragrant. Do not brown.

Add sweet potato and mushrooms and cook for about 2 minutes.

Stir in the carrots and green beans, cook for a minute. Add soy sauce and freshly-cracked pepper if you like. Add in the broth and bring to a boil, covered.

Once it boils, lower heat and cook until potato is tender, about 3-5 minutes. Do not overcook. Drain through strainer immediately to stop vegetables from cooking further, reserving the broth. You want to keep the crispness of the vegetables. Set vegetables aside to cool.


Make the sauce:
Return reserved broth to the pot. Stir in the sugar and soy sauce and bring to a boil.

Mix the cornstarch with 1/4 cup water to make a slurry. Stir into boiling broth until broth thicken. Turn off heat. Transfer to serving bowl.


Assembly:
Place a lettuce leaf in middle of lumpia wrapper.

Spoon about 1/3 to 1/2 cup vegetable filling. Close wrapper over the vegetables.

Ladle sauce on top and sprinkle with fresh garlic and crushed peanuts. Serve.


Kulinarya was started by a group of Filipino foodies living in Sydney, who are passionate about the Filipino culture and its colorful cuisine. Each month we will showcase a new dish along with their family recipes. By sharing these recipes, we hope you find the same passion and love for Filipino Food as we do.


Please visit my fellow Kulinarya members for their Lumpia creations:

Kath - http://www.acupcakeortwo.com/
Trisha - http://sugarlace.com/
Trissa - http://trissalicious.com/
Olive - http://www.latestrecipes.net/
Ninette - http://bigboldbeautifulfood.blogspot.com/
Peach- http://www.thepeachkitchen.com/
Althea- http://www.busogsarap.com/
Asha - http://forkspoonnknife.blogspot.com/
Malou - http://www.impromptudiva.com/
Cherrie - http://sweetcherriepie.blogspot.com/
Acdee - http://acdee.blogspot.com/
Valerie - http://www.acanadianfoodie.com/
Sheryl - http://crispywaffle.com/
Divina - http://www.sense-serendipity.com/
Anna - http://www.anniesfoodjournal.blogspot.com/
Dahlia - http://www.energychef.blogspot.com/
Joy - http://joyjoycreativeoutlet.blogspot.com/
Maribel - http://www.foodgeek.webs.com/
Tressa
Jen - http://www.jen-at-work.blogspot.com/
Pia - http://bisayajudkaayo.blogspot.com/
Malaka - http://thegrandinternational.com/.
Mimi - http://lapinchecocinera.blogspot.com/
Erika - http://ivoryhut.com/
Kat - http://www.caterersearch.com/tabletalk/default.aspx

If you'd like to learn more about our Filipino cuisine, please read Tracey's (of Tangled Noodle) latest post on Filipino Food: Of Thin Skins and Filipino Food. She had eloquently written about the multiple facets of our cuisine and dismissed the negative notions of what the uninformed public perceive Filipino food to be - a very frustrating subject among fellow Filipino food bloggers like myself (or for any Filipinos). I applaud her for articulating so well what I have thought about many times but can never quite convey. Tracey also has a recipe for Lumpiang Sariwa so you can see for yourself how really versatile this recipe is.

August 19, 2010

Paella (and the best-laid plans)


I had the best plans laid out this summer. I told myself that once my children are on summer break, I will devote some time on this little blog of mine. "One post a week, at least" was what I said. But then work called, a 2-week gig wasn't bad but next thing I knew it kept getting extended: 16-hour days, staying until past midnight at Disneyland (without my family, it was not enjoyable at all), driving all over the city had kept me away from my kitchen. Work is done for now and I am still feeling it's effects; these couple of weeks I have just been catching up on sleep and hanging out with my boys. And I'm very glad to be cooking again in my own kitchen.


One more thing about best-laid plans. I cooked paella for the first time last week. Months ago, my husband mentioned he had only eaten paella at restaurants and had an idea to cook it at home. My husband, a kitchen gadget-freak, (which I am grateful for) wanted to get the right equipments for cooking paella so first thing we searched for was a paella pan. Williams-Sonoma only sold copper pans which are beautiful but was way beyond our budget. Sur La Table and LaTienda.com had traditional steel pans which costs about $30 but after diligent search we found the same pan at Cost Plus World Market for half the price! Unsure why another several weeks would pass before we bought the paella rice but then both the pan and rice stayed in the kitchen for awhile. Circumstances like my summer job and husband's month-long detox cleanse delayed cooking paella even further.

So last week at the dinner table, the kids finally decided to "just cook paella already!" To celebrate the end of my job and their dad losing 20 pounds, the kids said (Ha, and I'm sure they just heard a little too much discussion and planning about this dish.) So over the weekend, we drove all over searching for Spanish chorizo and made sure to get the freshest seafood. The seafood market didn't have fresh mussels but we didn't want another reason to delay our cooking so we compensated by buying extra prawns. My husband also bought a dungeness crab but decided to cook this separately. We even bought Spanish saffron even though we had 4 grams of Iranian saffron in our pantry (Do you know if there is a difference in taste between the two?)

Growing up in the Philippines, my family had always cooked paella. It was not as authentic as they do in Spain for we used sticky rice and safflower (instead of saffron) and my lola (grandma) and aunts just cooked paella in a wok! Another vivid memory was the paella was always cooked over a wood-burning stove. So I attempt to replicate my family's version of paella using the BBQ.


Paella
serves 6-8 people

1/2 tsp saffron
3 cups chicken broth
2 TBSP olive oil
chicken: 2 wings, cut at joints & 2 thighs, deboned & cut into thirds
Spanish chorizo, cut 1/2 thick in a bias
1 red bell pepper, cut into strips
1 med onion, finely minced
4-5 garlic cloves, finely minced
5-6 plum tomatoes, seeded & finely chopped
1 TBSP paprika
1 bay leaf
2 cups paella rice
prawns, 8-16 pieces
clams 12-20 pieces
3/4 cup peas, thawed if frozen

Crush saffron in mortar & pestle, add to chicken broth and set aside.

Heat pan over medium high heat and brown chicken, 2-4 minutes per side. Remove from pan and set aside.

Add the chorizo and brown on all side. Remove and place together with chicken.

Add the red bell pepper to soften a little, do not brown. Remove and put along the chicken & chorizo. Drain some of the oil until 2 TBSP of oil is left.

Add onions until soft, about 2 minutes, add garlic and cook until fragrant.

Place tomatoes and stir until thickened, about 2 minutes. Stir in paprika and bay leaf.

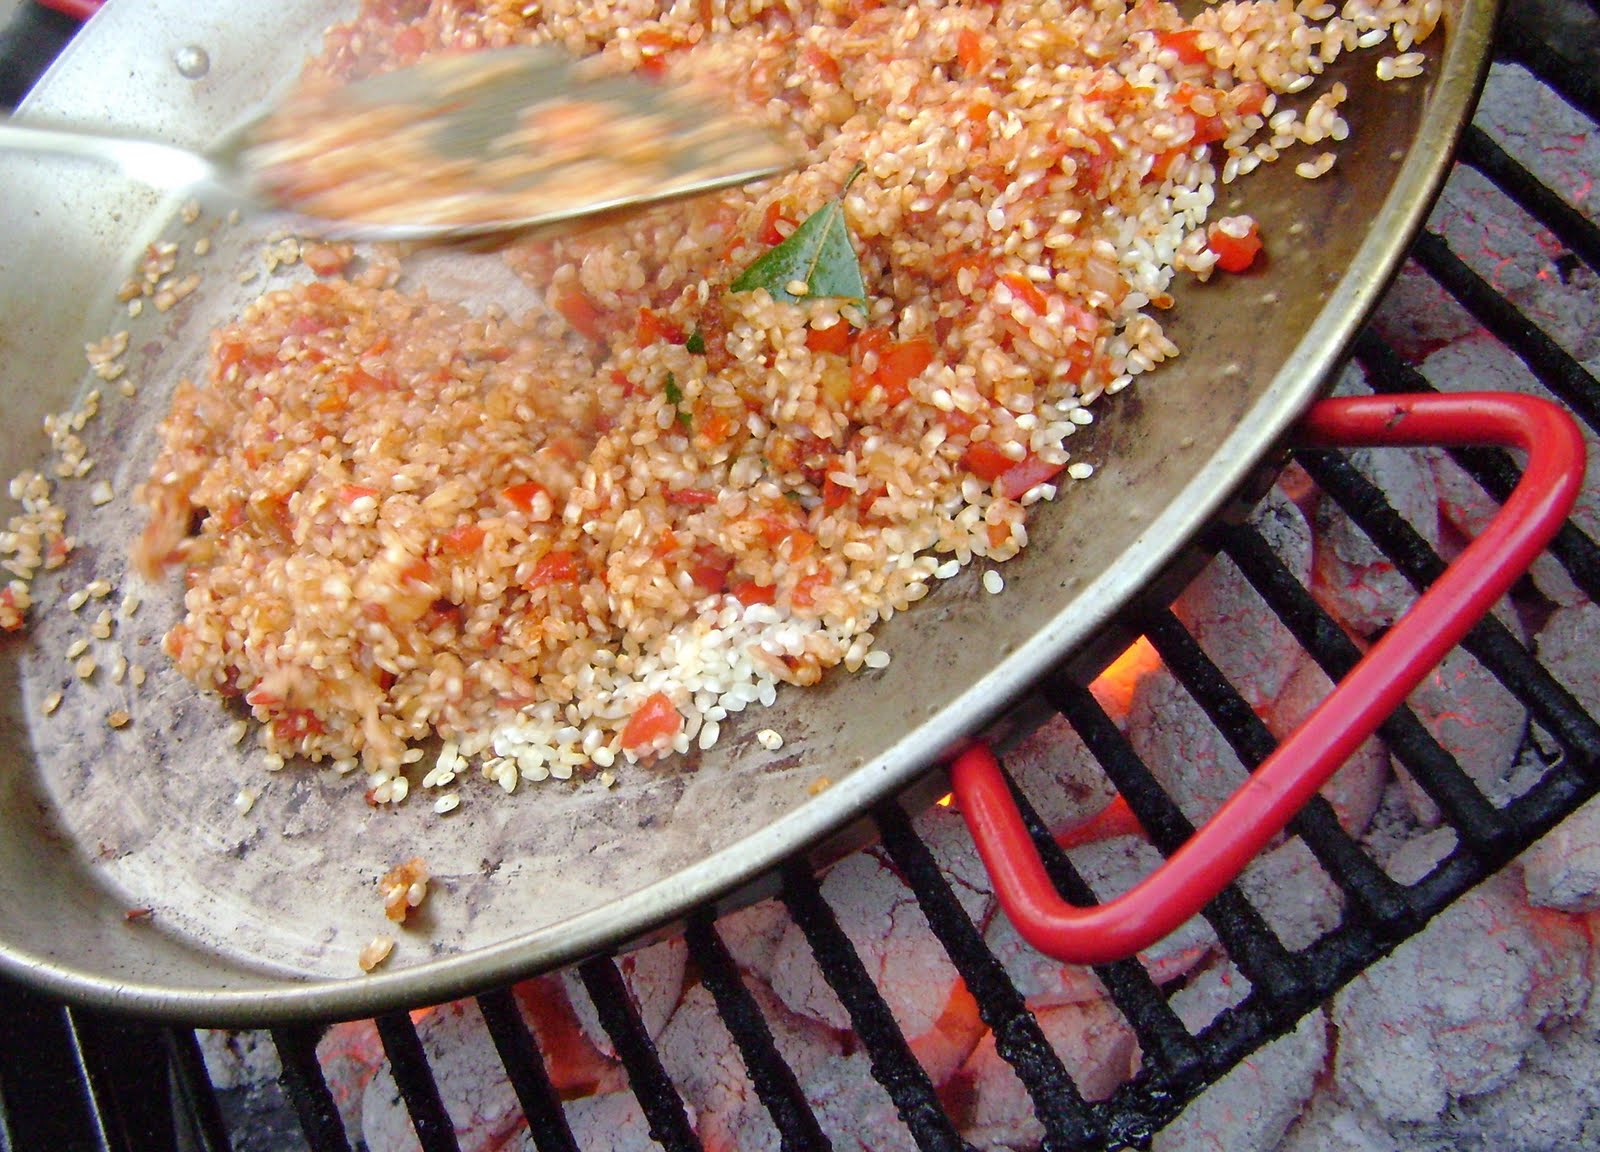
Add rice and stir until rice is completely covered by tomato mixture,about a minute. Add broth and bring to a boil.

Return chicken back in pan. Reduce heat to medium (I just scattered the charcoal around) and let it simmer until most liquid has evaporated, about 10 minutes.

Test the rice for doneness (if still hard, cover pan with tin foil for few minutes). Once rice is done, place prawns, clams and return the chorizo and bell peppers. Sprinkle the peas. Dish is done when clam shells open and prawns turn pink. Take off the heat and cover again in foil. Let it stand a few minutes. Serve.
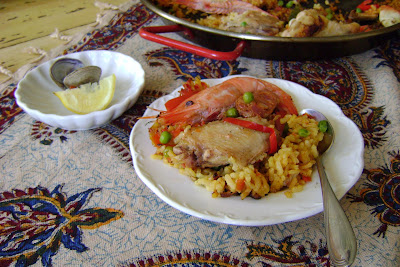

I was very pleased with the results being this my first try. I liked that I used the BBQ grill since I was worried about the paella not cooking evenly if I would have used the stove top. Though I felt a little rush in the beginning (the chicken could be browned more), I think it was the nerves and excitement of cooking it plus having an audience (my husband and our boys) watching my every move got to me a little. Thank you to my husband for taking the action shots and my boys who arranged the prawns and clams so beautifully. I am excited to cook paella again soon.

So in the end things don't always turn out the way we plan. And even though this summer is almost gone, my family and I would remember this as the summer we made paella.

LinkWithin

Blog Widget by LinkWithin