Showing posts with label Cakes. Show all posts

February 9, 2015

Chocolate Meringue Cake


I had this craving for brownies AND pavlova over the weekend so a date was set Saturday night. Just me, my mixer and the oven. 

It is such a great mash-up of my two favorite desserts: chocolatey, cakey layer topped with crisp meringue softened with softly whipped cream. The strawberries added the fresh element that paired together with both the cream and chocolate. I'm sure other berries would work well, maybe even fruits in season. 

It was such an easy cake to whip up. The longest wait was spent for the cooling of the cake which is needed before the whipped cream is added. The finished cake is impressive, making others think more time and effort was spent. 

I didn't realize I had ran out of berries late Saturday night so cake was assembled and enjoyed after Sunday supper. My family was happy to enjoy this with me. And my sons now call this a "just because" cake. 
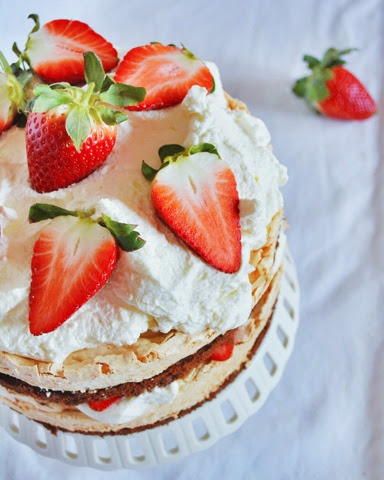


Chocolate Meringue Cake
adapted from The Joy of Baking

Chocolate Layer:
4 large egg yolks
175g AP flour
60g cocoa powder
1 1/2 tsp baking powder
1/4 tsp salt
152g butter, room temperature
130g granulated sugar
1 1/2 tsp vanilla extract
110g milk, room temperature
Meringue Layer:
4 large egg whites
1/4 tsp cream of tartar
175g granulated sugar
Chantilly Cream:
480g heavy whipping cream
45g granulated sugar
1 tsp vanilla extract

Preheat oven to325F. Prepare two 8-inch springform cake pans by oil spray and lining with parchment then spray again.

Sift flour, cocoa powder, baking powder and salt into a medium bowl, set aside.

In a mixer with paddle attachment, cream butter over medium-high speed, adding sugar a tablespoon at a time. Once added, keep mixing until light and fluffy, about 5 minutes.

Reduce speed to medium and add egg yolks one at a time, beating well after each addition and scraping bottom of bowl.

Reduce speed to low. Add cocoa-flour mixture in 3 batches alternating with milk and beat until just combined.

Place batter into your prepared pan. The batter will be thick, it helps to smooth out with an offset spatula, set aside.

In a clean mixer with whisk attachment, beat egg whites in medium speed with cream of tartar until frothy. Turn speed to high and beat until stiff peaks form.

Evenly divide meringue between the two pans, smoothing tops. Bake for 24-28, switching sides halfway through. Transfer in rack to cool completely.

To make the Chantilly cream, place cream, sugar and vanilla in a chilled bowl and whisk until soft peaks form.

To assemble: place one layer of cake, meringue side up on a serving plate. Spread half of the cream and add berries in an even layer. Top with second layer of cake and repeat. Best served the day it's assembled. Cake can be kept in the refrigerator for a day.  

November 16, 2011

Coconut Pandan Chiffon Flan Bundt Cake

I've been thinking for weeks now of what bundt to bake to celebrate National Bundt Day with Mary, The Food Librarian. She has been posting a bundt every single day for thirty days leading up to this food holiday. I've even gone through her archives and round-up from the previous years. Last minute inspiration while thinking about my last year's Ube Chiffon Flan Bundt led me to bake a Coconut Pandan Chiffon Flan Bundt Cake.

Pandan is a tropical plant widely available and used in cooking in Southeast Asia. My Lola always told me to place a pandan leaf in the water when cooking rice to make it special; I would be the one told to cut a leaf off our plant in the backyard. I didn't mind since I know I'm in for something special - just the lovely scent that fills the house as it cook is just heavenly.

I have not had luck finding a pandan plant here in US but the leaves can be found in the frozen section of most Asian stores. Some stores will have fresh leaves once in a while so that's when I stock up. Pandan's flavor matches perfectly with coconut, a popular Filipino dessert is Coconut Pandan Gelatin with strips of young coconut and green cubes of pandan gelatin.

Taking those flavors and putting it in a cake form with added leche flan (and caramel) puts this cake over the top! The smooth, creamy coconut leche flan along with light and airy coconut pandan chiffon cake are like yin and yang textures but with both flavors in harmony.

There are plenty of steps in making the cake but don't let that deter you. I promise it's all worth it!


Coconut Pandan Chiffon Flan Bundt Cake

For Coconut Flan:
1 cup sugar
1/4 cup water
7 egg yolks
1 cup unsweetened coconut milk
1 cup sweetened condensed milk
1 tsp vanilla
pinch salt

For Coconut Pandan Chiffon Cake:
240g (2 cups) all-purpose flour
300g (1 1/2 cups) granulated sugar
15g (1 TBSP) baking powder
5g (1 tsp) salt
7 pandan leaves, chopped into 1-inch pieces
3/4 cup unsweetened coconut milk
125ml (1/2 cup) vegetable oil
7 large eggs, separated
1 tsp. vanilla extract
few drops pandan essence
1/2 tsp. cream of tartar
  1. Make the caramel. Mix sugar and water together in a small saucepan and stir until sugar dissolves. Bring mixture to boil in medium-high heat until golden brown in color. Immediately pour into bundt pan, swirling caramel around until it covers the bottom and sides of pan. (Bundt pan will become hot from caramel, wear protective mitts!) Set aside to cool.
  2. Preheat oven to 325 degrees. Bring a pot full of water to boil needed for bain marie.
  3. In a bowl, stir egg yolks. Add both milks and vanilla extract and salt. Stir to combine completely. Strain mixture to rid of yolk solids and set aside while you prepare the chiffon cake.
  4. In a large bowl, whisk together flour, sugar, baking powder, and salt; set aside.
  5. Place pandan leaves and coconut milk in a blender and puree until all leaves are finely shredded and mixture looks green. Strain through several layers of cheesecloth, squeezing out all the liquid.
  6. Add oil, egg yolks, vanilla and pandan essence to the pandan-coconut mixture. Stir thoroughly to combine. Add to flour mixture and whisk until smooth.
  7. In another large bowl, beat egg whites and cream of tartar using an electric mixer until stiff peaks form. With a rubber spatula, gently fold beaten egg whites into batter, a third at a time, just until incorporated. Set aside.
  8. Pour leche flan mixture into the caramel-lined bundt pan.
  9. Spoon the chiffon cake batter into the bundt pan. DON'T WORRY, THE CHIFFON CAKE BATTER WILL STAY FLOATING ON TOP OF LECHE FLAN. Fill only up to 2 inches from top of pan -- batter will rise as the cake bakes. *You will have leftover chiffon batter, enough to make 6 cupcakes; something to tie you over while your bundt cake chill overnight. :)
  10. Pour boiling water into a bigger roasting pan - this is your bain marie. Place the bundt pan in and bake for 45-50 minutes. Check doneness of cake by inserting toothpick.
  11. Take out of oven and let cool completely.
  12. Cover top with plastic wrap and place in refrigerator to chill at least 4 hours, preferably overnight.
  13. To serve, invert onto a plate and enjoy!
 

October 21, 2011

Apple Cake with Cream Cheese Maple Frosting


This month marks the third year baking with The Cake Slice; we will be baking from The Cake Book by Tish Boyle. The book have separate chapters from chiffon cakes to pound cakes, butter-based cakes and fruit-based ones, flourless cakes, mousse and ice cream cakes, even chapters on cheesecakes and meringue cakes. I'm very excited to be baking from this book and have many recipes already bookmarked!

I really like that the recipes are written including weight (grams and ounces) along with the volume measurements. American cookbooks are still slow in adapting this type of measuring. When I started measuring ingredients with a kitchen scale a few years back, I noticed a vast improvement on my baking -- and importantly, my baked goods came out with consistent results. (If you don't have one, I highly recommend making an investment and purchasing one; they are not at all expensive). I am just happy to not be wasting time converting measurements and get on to baking when I use this cookbook.

On to our first cake: Apple Cake with Cream Cheese Maple Frosting. A perfect cake to celebrate Autumn. Chunks of apples, tender and still slightly crisp at the same time, along with walnuts make up this cake, warmly perfumed by cinnamon, cloves and ginger. Topped with cream cheese with maple flavoring and dusted with freshly-grated nutmeg for a really decadent slice. It's a simple, unpretentious cake that can be enjoyed anytime.


You can read Tish Boyle's blog here: http://www.tishboyle.blogspot.com/
Please follow her on Twitter: http://twitter.com/#!/tishboyle


Apple Cake with Cream Cheese Maple Frosting
adapted from The Cake Book by Tish Boyle
makes one 9-inch square cake, serving 12

181g (1 1/2 cups) all-purpose flour
1 tsp baking powder
1 tsp ground cinnamon
1/4 tsp ground cloves
1/4 tsp ground ginger
1/4 tsp baking soda
1/8 tsp salt
113g (1/2 cup) unsalted butter, softened
217g (1 cup firmly packed) light brown sugar
1 tsp vanilla
2 large eggs
160ml (2/3 cup) buttermilk*
120g (2 cups) peeled and chopped 1/3-inch pieces Granny Smith* apples
57g (1/2 cup) walnuts, coarsely chopped
  1. Preheat oven to 350F degrees. Grease pan and line bottom and two sides with a strip of parchment paper, leaving a 2-inch overhang on the two sides. Butter paper and set aside.
  2. In a medium bowl, whisk together flour, baking powder, cinnamon, cloves, ginger, baking soda and salt. Set aside.
  3. Place butter in the bowl of mixer and beat with paddle attachment at medium speed until creamy, about 1 minute. Slowly add the sugar and beat at medium-high speed until blended and lightened in color, about 2 minutes. Add the vanilla extract. Then add the eggs, one at a time, beating well and scraping sides as needed. Reduce speed to low and add the flour mixture in three additions, alternating it with the buttermilk in two additions and mix just until blended. Fold in the apples and walnuts.
  4. Transfer batter into pan, smooth the top and bake for 25 to 30 minutes, until golden and toothpick test is clean. Cool cake in pan on a wire rack.
  5. Frost top of cooled cake with Maple Frosting.
Cream Cheese Maple Frosting
makes 1 1/3 cups

170g (6oz) cream cheese, softened
42g (3 TBSP) unsalted butter, softened
1/2 tsp vanilla extract
1/8 tsp maple flavoring*
1/8 tsp ground cinnamon
1/8 tsp ground ginger
pinch of salt
pinch of freshly grated nutmeg
115g (1 cup) confectioneres' sugar, sifted

Using paddle attachment, beat cream cheese and butter together at medium speed until smooth. Add extracts, spices and salt. Reduce speed to low, add the confectioners' sugar and beat until well blended. Raise speed to high until light and creamy, about 2 minutes.

*I used homemade whole milk yogurt, Honeycrisp apples and maple syrup.

September 20, 2011

Blackberry-Pecan Snack Cake for The Cake Slice

This will be the last month The Cake Slice will be baking from the book Cake Keeper Cakes by Lauren Chattman. I have not been very active this year with our baking group due to work so made sure I made time this weekend to bake Blackberry-Pecan Snack Cake.

It just happens that my mother-in-law was also throwing a small party this weekend and she had put me in charge of desserts. I know that she adores fruits and streusel in her baked goods so made this cake for her.
The recipe asked for blackberries but blueberries or raspberries may also be used. I happen to have all three so decided to put a combination of all three berries. A simple recipe that uses only a little bit of butter with sour cream giving it richness. The batter is spiced by cloves and nutmeg while the streusel has cinnamon along with chopped pecans.
The party got a little hectic but was able to take a quick picture of the desserts table. Along with the Blackberry-Pecan Snack Cake front and center, I also baked Peanut Butter & Jelly Mini Muffins, Guava & Cheese Pastries, Leche Flan, Cheesecake with Blueberry Sauce, Coconut Sandwich Cookies with Passion fruit Cream and Brownies. My husband joined in the baking fun by making Cream Puffs and Seven-Layer Gelatin.
The cake was quickly eaten even with the assortment of other desserts on the table. I was glad I made time to bake this cake.

The Blackberry-Pecan Snack Cake recipe can be seen at Amazon, just click the "look inside" the book function.

July 31, 2011

Coffee Cake Muffins for Muffin Mondays


I can't believe it's been so long since I've posted! I was unexpectedly called to work in short notice and as always, it took longer than planned. I ended up working four weeks straight (mostly 16-hour days) with only a total of two days off. This surely got this little old blog of mine neglected.

So when work finally ended Thursday, I was excited to start cooking and baking again in my own kitchen. Annapet of The Daily Palette and Malou of Skip to Malou suggested I bake muffins with them. I've seen how much fun they've been having putting their own spin on a muffin recipe so of course I said YES.


This week we are baking Coffee Cake Muffins from Martha Stewart. These little cakes are moist and really tender due to sour cream and not only topped but also filled with crumbly streusel. A little mishap when I baked them yesterday, not realizing the recipe yields 12 jumbo size or 24 standard size muffins, I only used 1 standard muffin pan that only holds a dozen so you could probably just imagine the mess that ensued putting double the batter in one muffin pan.

So today, I decided to bake them again using the correct proportions and they came out so much better. I ended up using yogurt for the sour cream since I had used it all from the previous batch. This time, I also added a few sprinklings of Sugar, Chocolate & Coffee Beans before placing them in the oven. I bought this new item, a grinder gadget from Trader Joe's. Basically a pepper mill-type grinder filled with sugar crystals, chocolate and coffee beans. It produces coarse grinds of all three that gives you a little something crunchy-sweet with hints of chocolate and coffee. (though they looked like they were sprinkled with salt and pepper!) I have been putting it on every thing lately, from ice cream and yogurt to buttered toast and cereal. So if there's a Trader Joe's near where you live, I recommend you get one and try it for yourself.


Also want to share you my new cake stand. I know this style have been around awhile but I finally found one (and for a steal, too) so decided to get it as a gift for me for working so hard this past month. The best feature is that I can put different kinds of ribbons through it to match the treats I've baked. Also perfect since I now have another way to use my collection of vintage ribbons. :)

Muffin Monday is an initiative by Baker Street. A culinary journey of sharing a wickedly delicious muffin recipe every week. Drop in a quick line to join her on her journey to make the world smile and beat glum Monday mornings week after week.

June 26, 2011

Lychee Mousse Cake


Though I have been absent here for a couple of months, I've been baking up plenty of cakes. Last month, my youngest son turned seven and I baked him his request for a pineapple cake. This month alone, six people I know celebrated their birthdays. They all love to receive a cake since I've started the tradition several years back of baking birthday cakes. This Lychee Mousse Cake was especially baked for my sister-in-law.


Lately, I've been experimenting with my go-to Chiffon Cake recipe and adapting it to different flavors. I like to pair the chiffon cakes with a similar lighter fillings and found mousse to be perfect. So far these past weeks I've made pineapple (for my son's Pineapple Chiffon Cake), strawberry, chocolate and vanilla (for my niece's Neapolitan Banana Split Chiffon Cake), and peach-mango (for my other niece).

I've even gone and baked a Turon Chiffon Cake. This was just to satisfy a craving for turon when I found myself stuck at home without lumpia wrappers. This one didn't have a mousse filling but turned out a success so hope to bake another one soon to share with you.

But for now I'd like to share you my Lychee Chiffon Cake. The cake were baked in cake pans instead of the traditional angel cake or tube pans. The airy Lychee Mousse was filled in between the two cake layers and more mousse were spread on top. The cake was then finished with a little whipped cream and left for a few hours in the refrigerator to set. I made the cake in the morning and we enjoyed it after my sister-in-law's birthday dinner.


I used canned lychees since they are readily available. Realizing the canned lychees had a tinge of peachy color from the canning process, I added a few drops of red food coloring which gave the yellow cake batter (yellow from the egg yolks) a salmon-peachy colored hue which complemented the lychees a little.

I have already made plans to make this cake again. Next time I will try adding a mirror glaze like the ones I always see on those fancy patisseries.


Lychee Mousse Cake
make 9-inch cake

For Lychee Cake:
1 cup all-purpose flour
3/4 cup granulated sugar
1 1/2 Tsp. baking powder
1/2 tsp. salt
1/2 cup vegetable oil
5 large eggs, separated
1 tsp. vanilla extract
1/2 cup lychee syrup (from the canned lychees)
1/2 tsp. cream of tartar
few drops of red food color, optional

For Lychee Mousse:
1 cup lychee
1/4 cup lychee syrup (from canned lychees)
1/4 cup water
1/2 cup sugar
2 egg whites
1/2 TBSP gelatin
1 cup whipping cream

Whipped Cream Frosting:
2 cups whipping cream
2 TBSP sugar
1 tsp vanilla extract


For Lychee Cake:
Preheat oven to 350 degrees. Use pan spray or butter to grease bottoms of two 9-in pans. Line them with parchment paper. Do not grease the parchment or sides of pans.

In a medium mixing bowl, whisk together flour, sugar, baking powder, and salt; set aside.

In a small bowl, add oil, egg yolks, vanilla, and lychee syrup; mix to combine. Add to flour mixture and whisk until smooth.

In another large bowl, beat egg whites and cream of tartar using an electric mixer until stiff peaks form.

With a rubber spatula, gently fold beaten egg whites into batter just until incorporated. (DO NOT OVER MIX or you will deflate the air bubbles and cake will not be light and airy.) Add food coloring is using.

Divide into 2 prepared pans. Bake until a toothpick inserted into center of cake comes out clean, about 20-22 minutes.

Invert pans on cooling rack and let it cool completely, about 1 1/2 hour.

For Lychee Mousse:
Place lychee and syrup together in a blender or food processor and puree. Pour into a large bowl and set aside.(A)

In a small pot on medium heat, boil water and sugar until it turns into a syrup, about 5 minutes. Do not let it turn color, syrup should still be clear. Meanwhile beat egg whites to soft peak. Then gradually add in sugar syrup in a slow steady stream until stiff peaks form. Be careful with the hot syrup. Set aside.(B)

Whip the cream until soft peaks form, do not overbeat. Set aside.(C)

In a small bowl, soak gelatin in 2 tbsp of water for about 5 minutes to bloom. Then melt the gelatin in the microwave 15-20 seconds. Stir and add into the lychee mixture.(A)

Fold in the egg white (B) and whipped cream (C) into lychee-gelatin mixture (A) until just combined.

Whipped Cream Frosting:
Chill the mixing bowl and whisk you will be using by placing in the freezer, about 10 minutes.

Add very chilled whipping cream in bowl along with sugar and vanilla. Whip until soft peaks form.

Cake Assembly:
Place one layer of cake on cake board. Spoon about 2/3 of lychee mousse. Spread evenly up to 1/2 edge of cake.

Top with the other cake layer and spoon the remaining mousse.

Decorate the sides of cake with whipping cream frosting.

Place in refrigerator to chill until set, 4-6 hours but overnight preferable.

November 15, 2010

Ube Chiffon Flan Bundt Cake


If you ask a Filipino what their favorite dessert is, more than likely their answer would be Leche Flan and/or anything with Ube (Purple Yam). I love them both so I didn't hesitate to put them together in this dessert so you get to enjoy two sweets at once: Ube Chiffon Flan Bundt Cake.

I first learned about the awesomeness that is Flan Cake from Tracey of Tangled Noodle last year when she posted her birthday cake recipe that combined a creamy coconut flan atop an airy mocha chiffon cake. I never even thought this was possible. Sure, I've added cream cheese to my flan before that resulted in Leche Flan Cheesecake. But this combined two totally different flavors and textures; and somehow both layers complemented each other. Very awesome.

I used my Leche Flan recipe and Banana Chiffon Cake recipe substituting ube for the banana. Well, technically I didn't use ube in this recipe since fresh ube is not available in the US. So for this flan cake, I used purple sweet potato (sometimes called Okinawan sweet potatoes) that I oven-roasted until cooked through and put through a ricer. As noted by Jun-Blog, purple sweet potatoes make a worthy substitute for ube. (And while I am being technical here, those orange-fleshed tubers sold as yams are NOT but really belong in the sweet potato family. A wiki search on yam explains more. Also, ube is not the same as taro.) If purple sweet potatoes cannot be found, I'm sure imported prepared ube halaya (in jars, available in Asian markets) can be used.

While preparing the chiffon cake batter, I was disappointed to see the vibrant purple color of the sweet potatoes turn into yucky cement-color gray when mixed with the yellow yolks so I resulted to adding in several drops of ube extract to recover some of the color and I'm sure this added even more ube flavor. The usual chiffon cake recipe makes for one bundt cake. The addition of flan to the pan means less cake batter so this recipe yielded me one big bundt cake and a smaller llanera (flan mold).


Ube Chiffon Flan Bundt Cake

For Flan:
2 cups sugar
1/2 cup water
12 egg yolks
1 can evaporated milk
1 can sweetened condensed milk
1 tsp vanilla
pinch salt

For Ube Chiffon Cake:
2 cups all-purpose flour
1 1/2 cups granulated sugar
1 Tbsp. baking powder
1 tsp. salt
2 medium purple sweet potatoes, roasted and passed through ricer, 3/4 cup
1/2 cup vegetable oil
7 large eggs, separated
1 tsp. vanilla extract
1 Tbsp. Ube extract
3/4 cup cold water
1/2 tsp. cream of tartar

Make the caramel. Mix sugar and water together in a small saucepan and stir until sugar dissolves. Bring mixture to boil in medium high heat until golden brown in color. Then pour into bundt pan and llanera. Swirl caramel around until it covers the bottom and sides of pan. Set aside to cool.
Preheat oven to 325 degrees. Bring a pot full of water to boil needed for bain marie.
In a bowl, stir egg yolks. Add both milk and vanilla extract and salt. Stir to combine completely. Pour mixture through a strainer and set aside while you prepare the chiffon cake.

In a large bowl, whisk together flour, sugar, baking powder, and salt; set aside.In a medium bowl, place sweet potatoes, add oil, egg yolks, vanilla, ube extract and water; mix to combine. IF UBE IS LUMPY, PASS MIXTURE THROUGH A FINE STRAINER. Add to flour mixture and whisk until smooth.
In another large bowl, beat egg whites and cream of tartar using an electric mixer until stiff peaks form. With a rubber spatula, gently fold beaten egg whites into batter just until incorporated. Set aside.

Pour about 2 cups of leche flan mixture into the caramel-lined bundt pan. Put the remainder (about 1 cup) into the llanera.

Spoon the chiffon cake batter into the bundt pan. DON'T WORRY, THE CHIFFON CAKE BATTER WILL STAY FLOATING ON TOP OF LECHE FLAN. Fill only up to 2 inches from top of pan. Pour remaining batter in the llanera.

Pour boiling water into a bigger pan that would fit both the bundt and llanera. This is your bain marie, place the cake pans in and bake for 30 minutes. Check doneness of cake by inserting toothpick; the llanera should be ready since it smaller. Take out to cool. The bundt will need another 15-25 minutes. Check doneness by using toothpick. Take out of oven and let cool completely.
Cover top with plastic wrap and place in refrigerator to chill at least 4 hours, preferably overnight.
To serve, invert onto a plate and enjoy!


November 15 is National Bundt Day. Mary, The Food Librarian has been celebrating for a month, posting one bundt each day leading to this day. She had invited her readers to celebrate with her by posting a bundt cake - I'm glad to join the celebration!

October 20, 2010

Pumpkin Chocolate Chip Pound Cake for The Cake Slice

I'm finally baking! Just in time for this month's installment of The Cake Slice. We start off our third year of baking from the book: Cake Keeper Cakes, a promising cookbook filled with different types of cakes: from round ones to loafs, bundts to crumb cakes, chiffon and snacking cakes. I'm excited to get this year started with this book.

The first cake our group chose is Pumpkin Chocolate Chip Pound Cake to keep with the season's baking. October signals Fall and Halloween so a cake with pumpkin is a perfect choice. The addition of chocolate chips and walnuts along with cinnamon, cloves and nutmeg truly fits in with the season. A great cake to enjoy with creamy coffee or tea, even a tall glass of milk.
My youngest son requested one without nuts so I obliged him and just added more chocolate chips. This is the picture you see here. (The first loaf were eaten right away that I didn't get a chance to take a picture!) Please see how other members of The Cake Slice did with this cake and get baking, just print the recipe.

June 25, 2010

The Cake Slice: Shenandoah Valley Blueberry Cake


This month's cake chosen by The Cake Slice bakers is a very easy and simple cake to whip up. Reminiscent of blueberry scones, it's another pleasant way to enjoy blueberries that are plentiful at the farmers' markets at the moment. I am sure other berries may be used instead of blueberries like blackberries or raspberries. Maybe even chopped-up strawberries, too! And once berry season has passed, no worries because the recipe says frozen (unthawed) blueberries will work as well.


The recipe suggests baking in a 9-inch cake pan but I decided to use a slightly-larger tart pan to give the edges a little fancy :) The only drawback was my cake didn't achieve a certain height. Also, I was afraid the blueberries would sink to the bottom of the pan as it baked so I dusted them with a reserved tablespoon of the flour mixture before folding them in. Since my pan was not deep enough, they created little craters on top!

Besides it's unusual appearance, it was still scrumptious. My kids enjoyed a slice with some milk for an afternoon snack. I'm sure it will also be great with lemon curd, too and a cup of tea. Or maybe enjoy it topped with mascarpone whipped cream and a hot cup of coffee.


Just click Shenandoah Valley Blueberry Cake recipe to print and visit The Cake Slice Bakers to see their baked creations.

March 29, 2010

Meyer Lemon Upside-Down Cake


My husband works not more than two miles from our home. So around noon, he swings by to say hello and the family gets to have lunch together. A couple of weeks ago, he came later than expected. Why? Because he had stopped by a stranger's house, knocked on their door and asked if they would sell him some Meyer Lemons off their tree! He came home with his hands full of scratches, carrying a big bag full of Meyer Lemons! Just for me, he said!

Of course I had to share in Twitter but mostly to get some ideas from my follower friends. Mary was one to respond (which is funny since I've been kind of jealous of her around this time, with her blogging about her Meyer Lemon Fairy and all). She also has a Blood Orange and Cardamon Upside-Down Cake that the time and thought maybe I can sub the Meyer Lemons for the blood oranges (since I love upside-down cakes). Wouldn't you know she has an Upside-Down recipe using Meyer Lemons so dessert for the night was decided right then.

The recipe is from Los Angeles Times and can be printed here. It uses regular lemons but Mary substituted Meyer Lemons for them, you can read her post about it by clicking here. I have more Meyer Lemon recipes to share in several days so stay tuned. :)

March 20, 2010

The Cake Slice: Pineapple Upside-Down Cake


This month, The Cake Slice is featuring Pineapple Upside-Down Cake. For me, there is nothing better to welcome Spring and the warmer days ahead than with this sunny cake. Usually when an upside-down cake is mentioned, it's assumed it has pineapple. Growing up in the Philippines, pineapples are always eaten at my household since they grow abundantly there. Eating pineapples now always remind of my tropical birthplace and the warm weather; it is one of my favorite fruits.

I am always on the look-out for pineapple upside-down cake recipes and have baked plenty. The recipe for this cake uses canned pineapple but found that fresh pineeapples gives better flavor so opted to use fresh for this recipe.

Peeling a pineapple may be cumbersome for most people but I was taught early by my Dad not to peel so much of the tough skin and then make vertical slits all along the pineapples to cut off the "eyes" that runs deeper into the pineapple flesh. Please visit Jun for a great tutorial about peeling pineapples with lovely photos. Lately, though, I found it even easier to "gouge" the eyes out using the smallest melon baller which left me more pineapple to enjoy. :)


I made the recipe two weeks ago and was eager to try it but I am sorry to say that I have had better ones before. The brown sugar and pineapple topping is prepared like ones I have baked from previous recipes but the cake was dense and a little dry and the flavor a little bland. I really wanted to like this since I LOVE pineapple upside-down cakes but this didn't make me go WOW.

Well, a week passed and Jun posted a Pineapple Upside-Down Cake recipe. It is a recipe from Thomas Keller's newest cookbook ad hoc at home. Thomas Keller has a different take for the pineapple topping. He didn't cook the brown sugar and butter, instead they were creamed together and was spread in bottom of pan, a "pan schmear" which is a totally different way of making it. The pineapples were arranged differently as well, they look so lovely, like a flower. So right away I needed to try this recipe. Between the two recipes, I liked Thomas Keller's recipe better. The cake is light and moist and has a tender crumb.

If you have a pineapple upside-down cake recipe, please let me know for I would sure like to try it. Please visit my fellow Cake Slice Bakers for their pineapple upside-down cake creations.


Please click to print recipe from Southern Cakes
Link to Jun's Pineapple Upside-Down recipe
Link to Jun's tutorial on peeling pineapples

February 20, 2010

The Cake Slice: Mississippi Mud Cake


Time for cake! This time it's a gooey, sticky, chocolatey one that is so easy to bake. Haven't had time to update my blog due to work. Luckily, I had a day off today and this cake was made in no time at all.


My boys and I were playing Lego while the cake was baking. When it was time to take pictures, the boys thought it would be great for their Lego Star Wars to be in the picture. Then I decided they should be in the picture, too! :)


All that marshmallows was a hit with the kids they didn't even mind the pecans that were in the cake. Overall, a fun cake!

December 20, 2009

The Cake Slice: White Chocolate Layer Cake


Could you tell I was excited to be baking again with the The Cake Slice Bakers? Having missed the last few months, I am glad to be able to join in and bake this month's pick: White Chocolate Layer Cake. Our group gave an option to decorate the cake to go with the white theme and the holiday season. I was full of ideas until I happen to browse the Martha Stewart Holiday Sweets issue (Any day now, Paula!) that featured an Igloo Cake. I have seen this before from a previous Martha Stewart Living issue and thought it was adorable and tried to decorate mine like it.

The cake consists of three layers made with white chocolate and buttermilk; I baked one of the layers in a rounded bottom bowl that would go on top. The frosting was made with white chocolate and cream cheese. Both components were delicious and went well together. I also made white chocolate mousse for the filling.

Part of the decoration is to make penguins out of marzipan. The Cake Slice have used marzipan in our cake previously so I figured I would give it another try. That's when I got into trouble. I didn't have white gel paste coloring for the bodies of the penguins so decided to use marshmallows. I tinted the marzipan blue for the penguins head and wings and orange for the feet. It started fine but after several minutes my marzipan started drooping. See what I mean?

I thought the marzipan was the culprit so started again and used blue-colored saltwater taffy and orange-colored jelly beans. Got this idea from Hello, Cupcake book my kids would always borrow from the library. I think these fared better, see the rounded heads and bent out wings?


Of course, my kids had a blast helping out with the penguins. And eating them, too! And so did I, cake and all!


The Recipe for White Chocolate Layer Cake can be found in the Southern Cakes book. Happy Holidays to all my fellow Cake Slice Bakers.

December 12, 2009

Rainy Days


Today, I woke up to the sound of rain rapping on my window panes. My husband had already left for work and my boys were already busy watching their Saturday morning cartoons. These past several Saturdays have been the same since we've moved to our new place. I am slowly getting used to it. But today, it is raining and it is different somehow. It made me miss my husband more.

I baked these little cakes for him. And while I ate one with my boys today, how I wished my husband was with us, enjoying them together.


Sweet Potato, Yogurt, Brown Butter & Hazelnut Cakes
makes about 20 mini cakes

300 g sweet potato (about 3 medium-sized)
100 g butter
130 g hazelnuts
160 g all-purpose flour
40 g hazelnut flour
4 g sea salt
4 g baking soda
1/2 tsp cinnamon
1/4 tsp ginger
pinch freshly grated nutmeg
100 g homemade yogurt (or substitute store-bought whole milk yogurt)
100 g brown sugar
50 g sugar
3 eggs, room temperature, slightly beaten
zest of half an orange

Make sweet potato puree: pierce sweet potatoes and place on baking tray, roast at 425F for 45-60 minutes or until tender. Let them cool, scoop out the insides and mash with fork. Set aside. Lower oven to 350F.

Brown the butter: place in small saucepan and heat on medium-low heat, stirring ocassionally. Butter will foam, keep stirring until it turns golden brown. remove pan from heat. Set aside.

Roast hazelnuts: place raw hazelnuts in baking tray and roast at 350F for 6-8 minutes. Place hazelnuts on kitchen towel and cover with another towel. Rub between the towels, skin will com off. Chop them roughly and set aside.

In a large bowl, combine by whisking together the flour, hazelnut flour, salt, baking soda, cinnamon, ginger and nutmeg.

In a medium bowl, combine the sweet potato puree, brown butter, both sugars, eggs, yogurt and orange zest. Whisk to combine.

Pour the wet onto the dry ingredients and whisk until fully incorporated. Fold in all but 1/4 cup of the hazelnuts.

Pour the batter into molds (or muffin tin) three-quarters of the way. Sprinkle tops with the 1/4 cup hazelnuts and bake for 16-18 minutes or until tester comes out clean.

Adapted from Canelle et Vanille

August 20, 2009

The Cake Slice: Pistachio Petit Four Cake


This month, The Cake Slice Bakers chose a cake modeled after petits fours, those tiny creations of cake layered with jam, marzipan, chocolate or fondant and decorated with a piped icing flowers. I was just glad I had to make it on a much bigger scale! This sure was a challenge to me since it was my first time to work with marzipan.


Even though assembling the cake involved many components, it was a thoroughly enjoyable process. It seemed complicated at first so I made sure I organized my work space and everything went smoothly. One hitch, I ran out of marzipan so I didn't get to try on making the roses needed to decorate the top.


The cake has pistachio butter cake layered with a spread of apricot preserves, topped with a disk of marzipan, then a little pouring of dark chocolate ganache. Repeat this two more times then comes my favorite part: pouring a bowlful of bittersweet ganache all over the cake! I find this is the most simple but elegant way to decorate a cake.


Every bite gives you a different dimension of flavor with the bittersweet ganache tying everything together. My kids, who are milk chocolate lovers, didn't even complain about the dark chocolate and everyone else enjoyed it. And why the blue flowers? I think my Kuya (big brother) would like it much better if they weren't pink since I made this for his birthday.


This is the printable recipe for this wonderful cake or just get the book Sky-High: Irresistible Triple-Layer Cakes since all of the cakes are great. Also, please head on over to our blogroll for my fellow bakers' creative interpretation of this cake.

July 20, 2009

The Cake Slice: Marbled Lemon-Blueberry Butter Cake


The Cake Slice Bakers choice for this month is a cake that features the classic pairing of lemons and blueberries. So delicious, a perfect balance of flavors and I thought all the components are portioned just right.

The cake was very easy to put together. My two alterations to the recipe: 1) I creamed the butter with a reduced amount of sugar (by a half cup), and 2) I doubled the lemon zest (since I didn't have lemon extract). Also, I've been wanting to not make a round cake for awhile now so I baked mine in a half-sheet pan (12 x 18 x 2) and cut into three rectangular pieces for the layers. I had some problems with pouring the blueberry batter needed for the marbling effect. I think I might have poured too much so they look more like splotches than swirls. Kinda reminds me of these. :)


I was a little woried that my lemon-blueberry preserves wont be substantial enough as a filling for the cake (even though I had yielded more than 1 cup) but found it was just the right sweetness (and zing due to the addition of ginger in the preserves) needed to offset the richness of the lemony butter cake.


And I almost goofed on the lemon buttercream frosting. I separated the yolks out and had started to whip the whites. I took a second look at the book for something and noticed the recipe asked for whole eggs! This was a first for me using whole eggs in the frosting. So I took the two egg yolks and placed them in the mixing bowl right away.

This frosting was good overall. I usually double the frosting recipes from the book since I always seem to run out. Probably because my boys always wanting to lick the spatula and beaters when I make them :) This time I'm not sure why I didn't so thinking I would run out I frosted the cake really thinly, like I crumb-coated the cake twice. It turned out to be a good thing since the cake was really buttery already. The thin coat of frosting was all it needed to put it all together, I thought.

This cake went out to my sister who celebrated her birthday last month. The cake was served for dessert after a simple birthday blowout dinner at a Chinese restaurant.


(On a side note: This was also the last solid food I ate before I went on a detox cleanse. That is probably the reason why it's been pretty quiet here in this lil' blog of mine. More on this later. Also, I was called to work for a couple weeks and just found out I am to report to work again tomorrow which will last another 10 days. I miss reading up on all my favorite blogs and hope to back blogging soon.)

Print recipe for Marbled Lemon-Blueberry Butter Cake

LinkWithin

Blog Widget by LinkWithin